
D365 Retail APIs Part III: How to use the Retail APIs from Power Automate (Flow) and Logic App
Updated 26 January 2024
After walking through the overall D365 Retail API Architecture in part I and II of this series on the D365 Retail APIs, it’s now time to enable anyone to actually use the Retail APIs. To allow this, this blog post will contain all details on how to construct a request to most of the 400 out-of-box D365 Retail APIs – Beyond that, I’ve included a step-by-step instruction on how to use any of the Retail APIs from Microsoft Power Automate (Flow).
But before we can really get things rolling, we first need to apply some additional D365 setup and we need to choose the right security pattern. So that’s where I’ll start this blog post.
Note: to effectively consume the content of this blog post, please ensure to familiarise with the content of Part I and Part II.
1 – Security
In Retail world, we’re utilising a variety of sales channels which are operated by a variety of users: in general, 3 types of users can be recognised:
- Employees: in-store POS systems and Call Center applications are operated by Retail employees.
- Named consumers: consumers unveiling details on their identity (name, address etc.) while making purchases via Social media, e-com platforms, consumer apps etc.
- Anonymous consumers: guests making purchases without consent on saving information about their identity
Looking at privacy and data security in general, it is crucial to restrict access to the 400+ D365 Retail API end points for use by each of the 3 categories of users. For example, we certainly do not want the guest visitors on our e-com website to be able to retrieve information from other customers on loyalty points, purchasing history or product recommendations. At the same time, we don’t want our self-checkout consumers to apply manual discounts :). In summary, we need a mechanism to make our Retail end points (which are the gateways to our Data and Business logic) available to only those users who are allowed to use them.
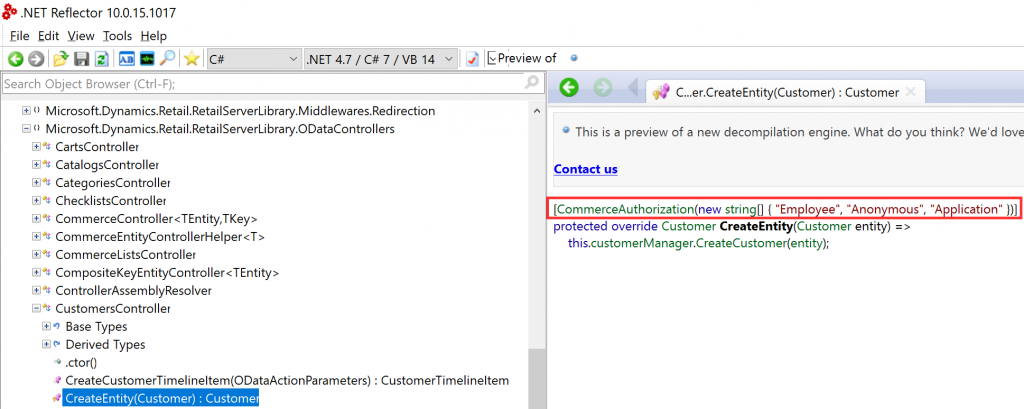
If you look inside Retail Server as we’ve done in Part II, you’ll find that each of these end points have a special attribute called “CommerceAuthorization” (see picture 1 below). This attribute basically lists the 1 or multiple “Commerce Roles” which are allowed to use the endpoint.

Picture 1 – CommerceAuthorization Attribute on a Retail Server OData endpoint
These “Commerce Roles” are very much in line with the user groups we acknowledged earlier:
- Role 1 – Anonymous: this role represents our anonymous customers. It will be of no surprise that only a few D365 Retail APIs are exposed to be used anonymously
- Role 2 – Customer: this role represents our named consumers
- Role 3 – Employee: this role represents our Retail staff
- Role 4 – Application: this generic role is designed for third-party applications which do not operate on behalf of a specific user (Customer or Employee)
Picture 2 below depicts the purpose of Commerce Roles in a bit more detail. As you can see in this picture, every D365 Retail API is enabled for 1 or multiple roles. Since the Customer and Employee role are built around a known identity (from a consumer or staff member respectively), both roles build upon the use of ID Tokens. In short, ID tokens contain encrypted details on a person’s identity (name, account number etc.) In case of Employees (in-store!) the encrypted ID Token contains the Employee number and Password which we know are used for logging into MPOS/CPOS.
Last but not least, picture 2 highlights the Commerce Role Application. This is the role we’ll focus on in the remainder of this blog post as it can be used for integrating any third-party application (e-com platforms, third-party POS systems, Apps etc.). As visible in picture 2, the Application role works by Access tokens. This is exactly the type of authentication most of you will recognise from the very commonly used D365 F&O (backend) APIs. Remember: similar to the D365 F&O backend APIs, the D365 Retail APIs are also based on OData, so there’s not much of a difference on how to consume them as you will see below.
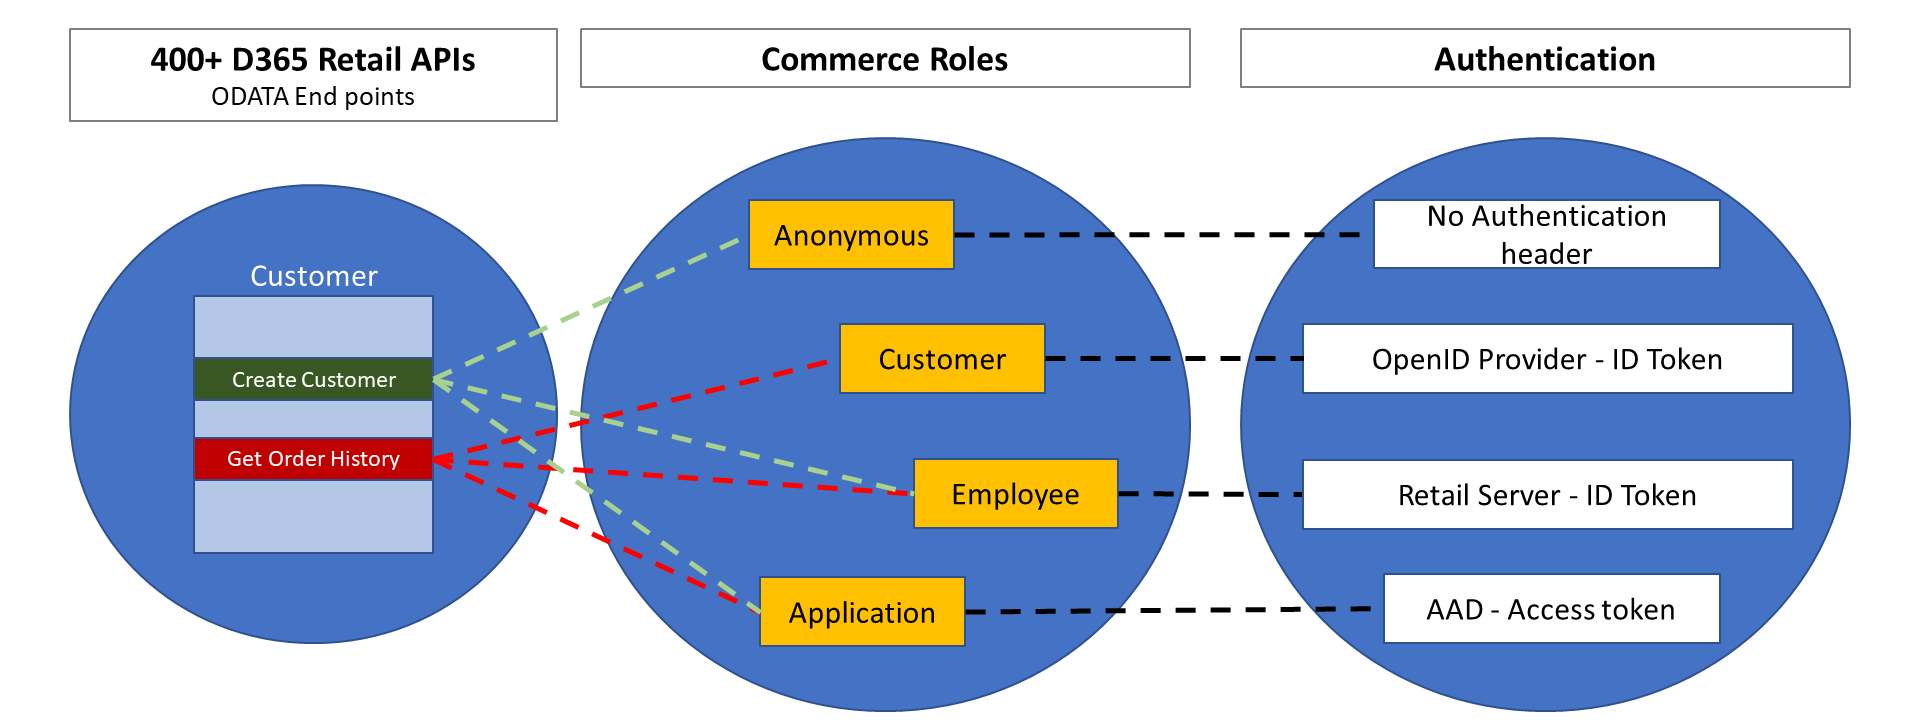
Picture 2 – The purpose of Commerce Roles
2 – Azure Setup
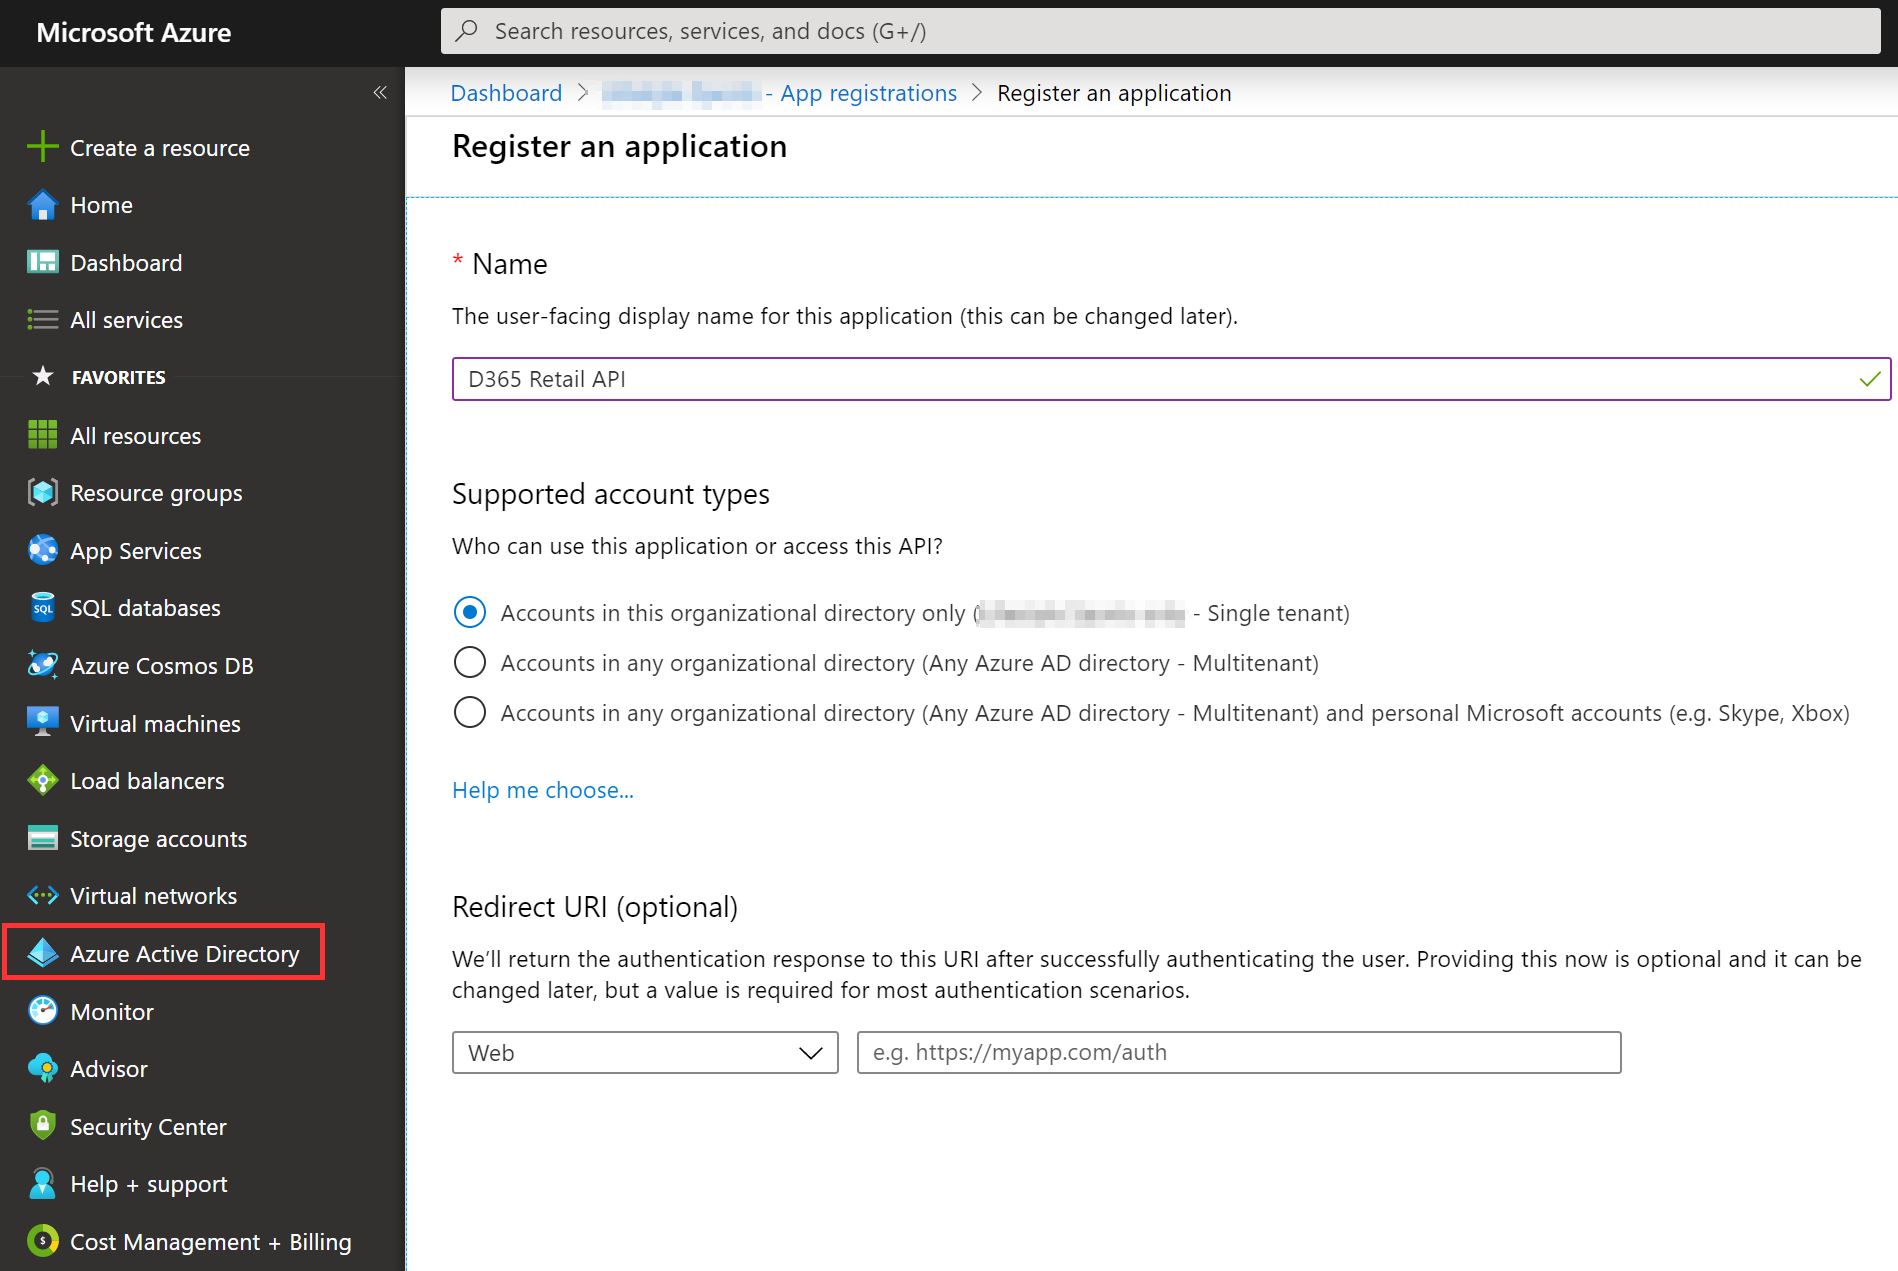
In order to allow an external application to make requests to the D365 Retail APIs, we need to register the application in our Azure Active Directory (1) and allow access to D365 for this application (2). Let’s start with the Azure side of things. Here’s how to register the application:
STEP 1 – Register the Application
- Open Azure portal
- Navigate to Azure Active Directory > App Registrations
- Click New registration
- Enter the following details (note: Name can be the name of your application such as the name of the e-commerce platform, App etc.) and save these details
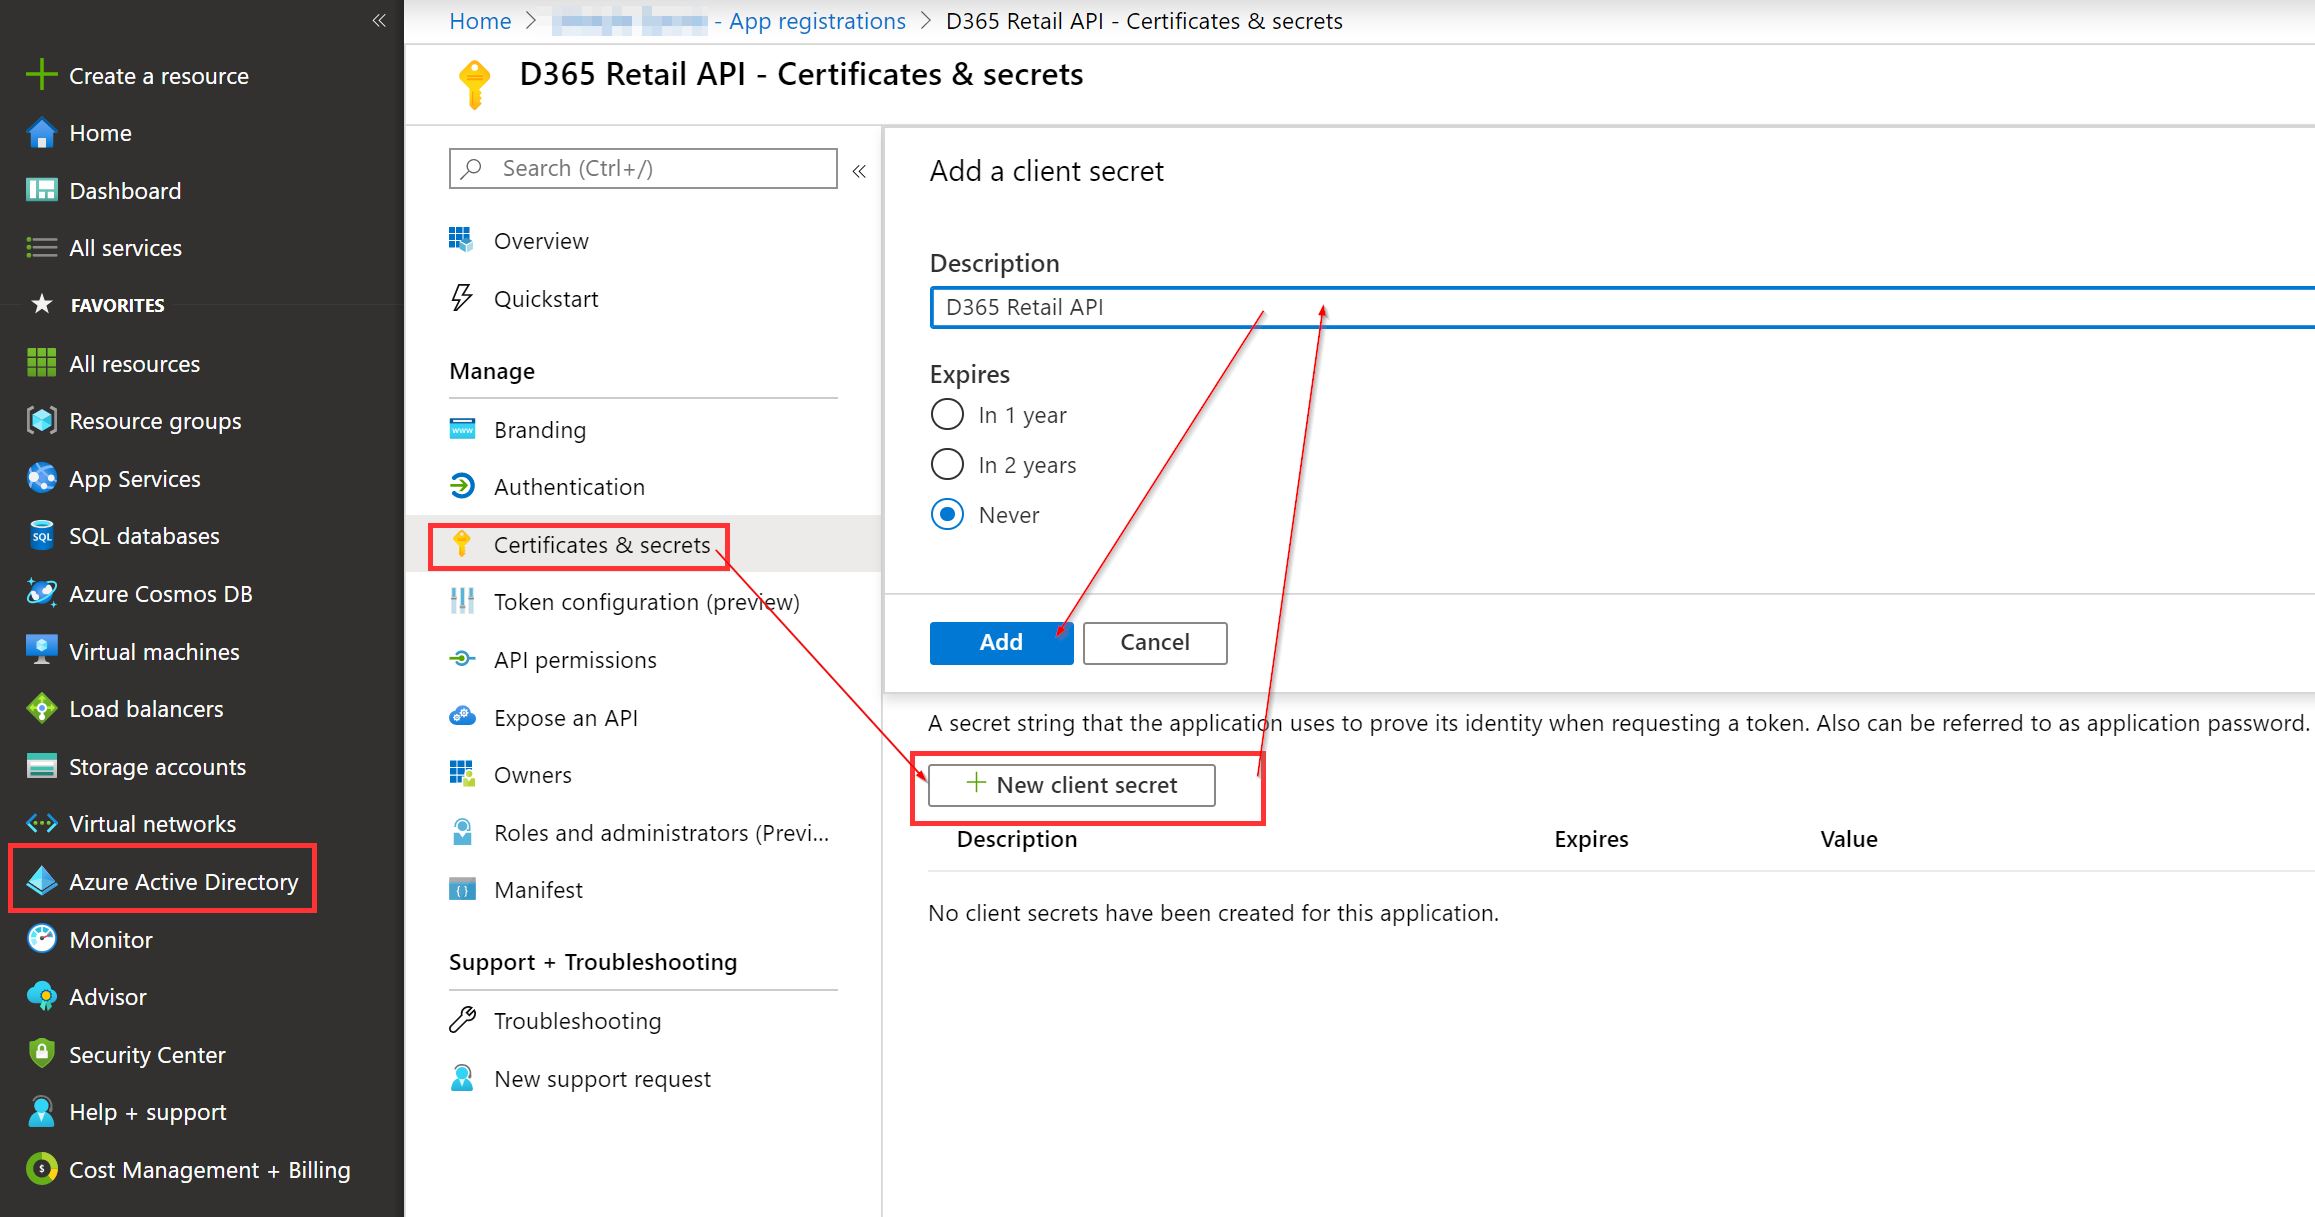
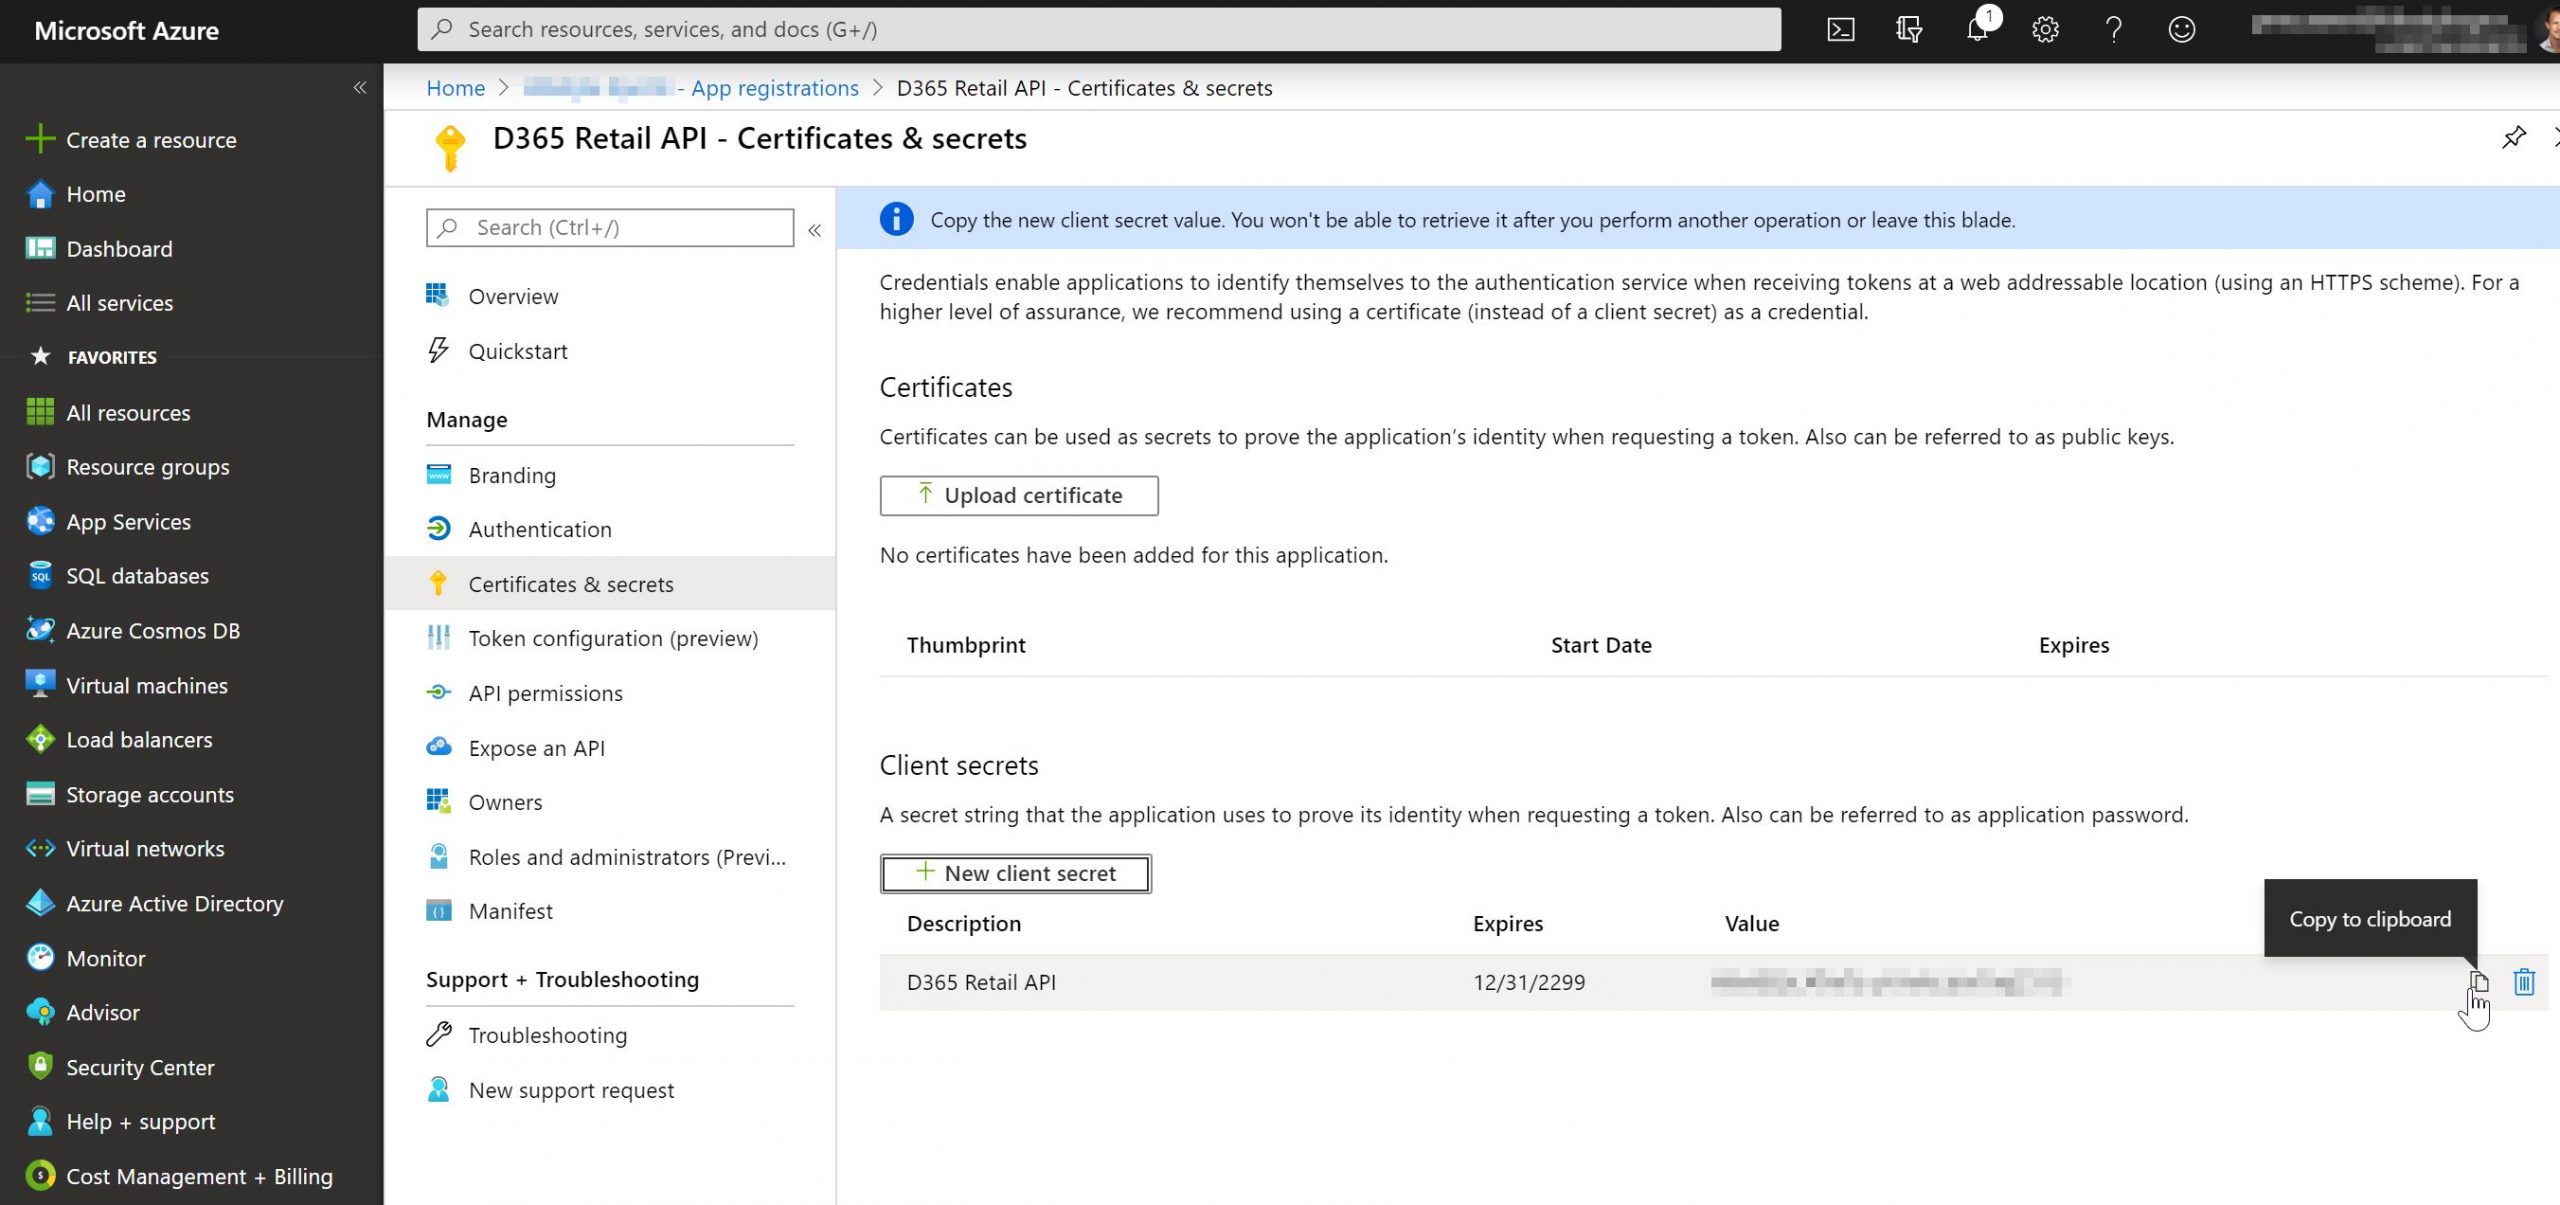
STEP 2 –Create and Copy App Secret
- Navigate to Azure Active Directory > App Registrations -> Click on the App you registered in step 1
- Click Certificates and secrets
- Create a new client secret as per below picture
- Select the Copy to clipboard icon to copy the Secret
- Paste the Secret in a safe place, for example a OneNote page – You’ll need it later
STEP 3 –Create and Copy App Secret
- Navigate to Azure Active Directory > App Registrations -> Click on the App you registered in step 1
- Click Overview
- Copy the Application (client) ID
- Copy the Directory (tenant) ID
- Paste both IDs in a safe place, for example a OneNote page – You’ll need them later

3 – D365 Setup
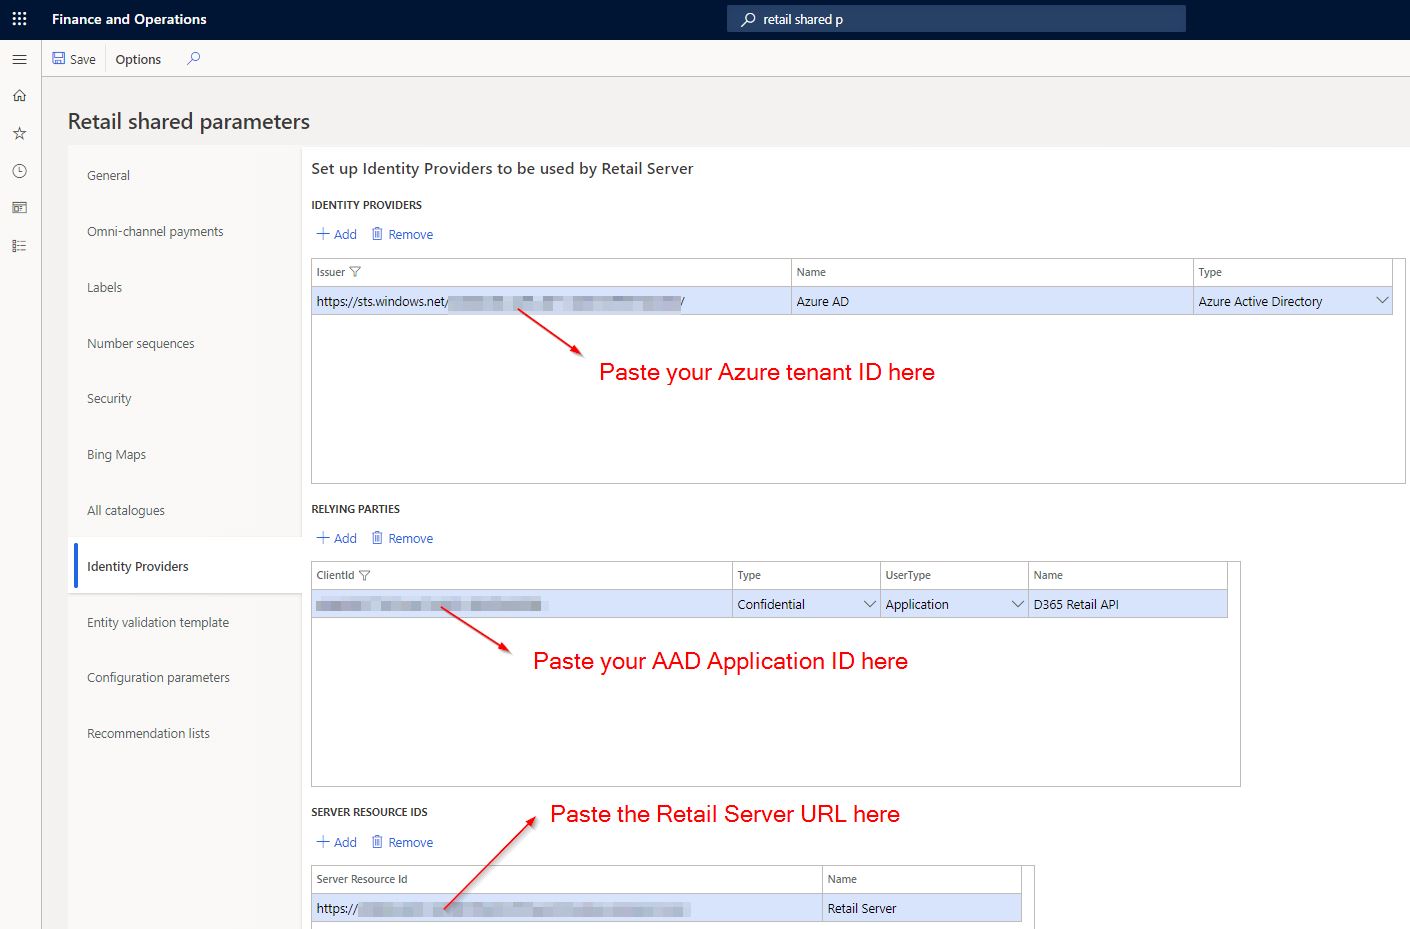
STEP 1 –Register the Identity Provider in Retail Shared Parameters
- Navigate to Retail > Channel Setup > Channel Profiles
- Copy the Retail Server URL without the /Commerce suffix
- Keep a note of this URL, for example on a OneNote page – You’ll need it below
- Navigate to Retail > Heaquarter Setup > Parameters > Retail Shared Parameters -> Tab Identity providers – Create the entries as shown in the picture below:
- IDENTITY PROVIDERS > Issuer: Please note the / behind the URL so https://sts.windows.net/
/ – Paste the tenant ID as copied in Azure Setup -> Step 3 above - RELYING PARTIES > ClientID: paste the Application ID as copied in Azure Setup -> Step 3 above
- SERVER RESOURCE IDS>Server Resource ID: paste the Retail Server URL which you copied from the Channel Profiles form
- IDENTITY PROVIDERS > Issuer: Please note the / behind the URL so https://sts.windows.net/
STEP 2 –Assign security permissions to the Application
- Navigate to System administration > Setup > Azure Active Directory applications
- Create a new record and paste the Application ID as copied in Azure Setup -> Step 3 above
- Select a user account for the Application – Please note that the user should have sufficient privileges for the operations the external Application should be able to perform against D365.
STEP 3 – Synchronise the Setup to the Retail channel Database
- Navigate to Retail > Retail IT > Distribution schedule
- Run the 1110 (Global configuration) schedule
- Note: in some rare cases I’ve come across it was needed to run the 9999 job
4 – Request format
Now the Setup on Azure and D365 is done, we’re ready to make the D365 Retail APIs work for us.
STEP 1 – Request an Access Token
Request format:
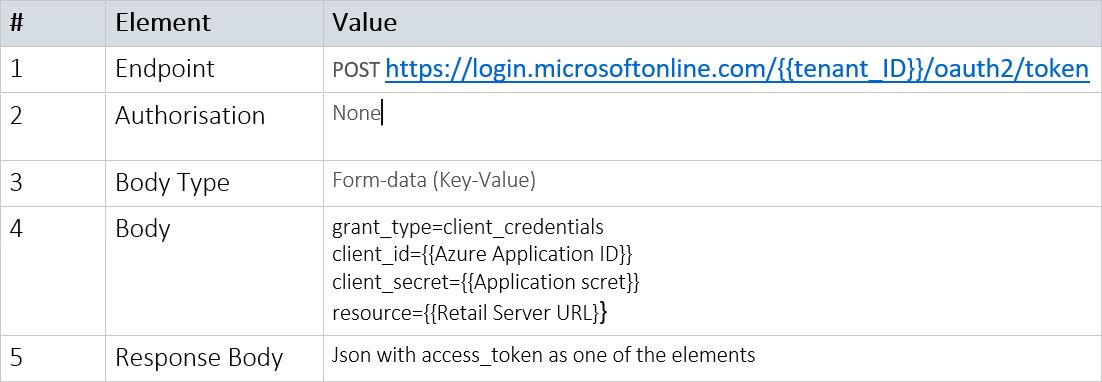
Notes:
- {{Tenant ID}}: paste the Tenant ID as copied in Azure Setup -> Step 3 above
- {{Azure Application ID}}: paste the Application ID as copied in Azure Setup -> Step 3 above
- {{Application secret}}: paste the Application secret as copied in Azure Setup -> Step 2 above
- {{Retail Server URL}}: paste the Retail Server URL as copied in D365 Setup -> Step 1 above
- The access_token value from the response is to be passed as Authorization header value in the actual request (see step 2 below)
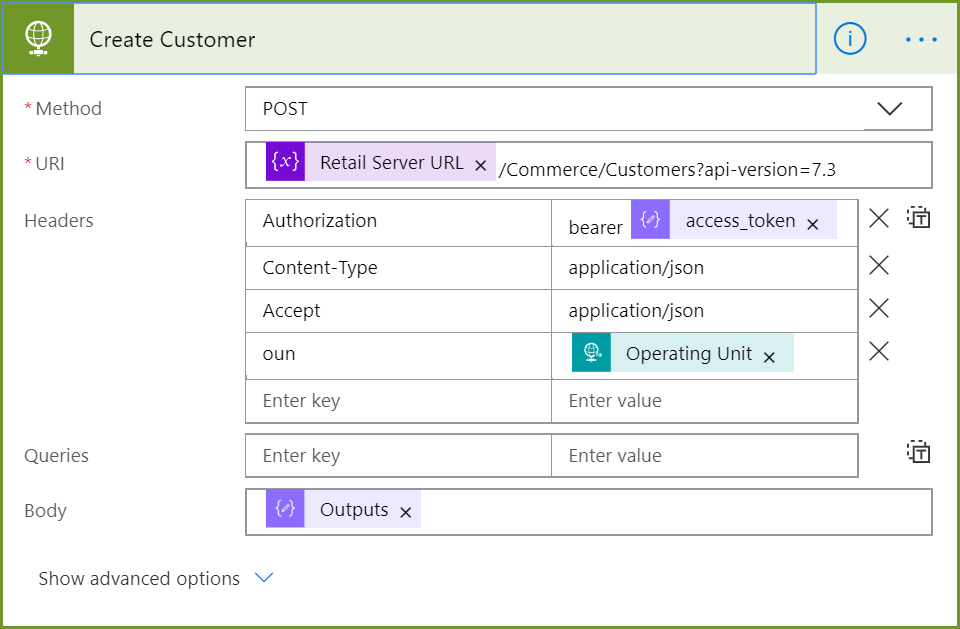
STEP 2 – Make the Request to Retail Server – Example: create a customer into D365 backend via the Retail APIs
Request format:
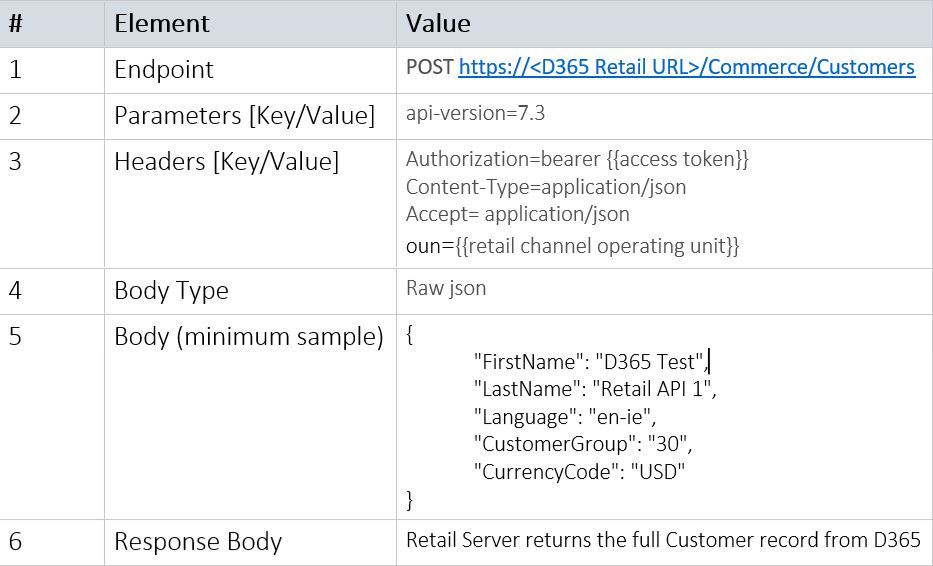
Notes:
- {{D365 Retail URL}}: paste the Retail Server URL as copied in D365 Setup -> Step 1 above
- {{access token}}: copy/paste the value from the access_token entry in the Body response from step 1
- {{retail channel operating unit}}: copy/paste the Retail channel number representing the Store or Online store. You can find this number on the Organization administration > Organizations > Operating units form in D365 F&O. For example: 052 represents the Houston store.
5 – Postman Setup
To kick-start you on using the D365 Retail APIs, I’ve packaged above Request into a ready-to-go Postman setup. Follow below steps to get it rolling.
STEP 1 – Download and Installation
- Download and install the Postman client
- Download the Postman Environment and Request Collection I have prepared for you from my OneDrive.
- Open Postman and click File>Import – Click Choose files and select the 2 files as downloaded from my OneDrive: D365 Retail APIs Part III – Environment.postman_environment and D365 Retail APIs Part III – Requests.postman_collection
STEP 2 – Fill out the Environment variables
- In the top right, set D365 Retail APIs Part III – Environment as the active environment
- Click the Manage environments icon
- Click on D365 Retail APIs Part III – Environment
- Fill out the values which are specific to your environment (See Azure Setup and D365 Setup above) for the entries starting with Input your..
- Click Update to save the new values

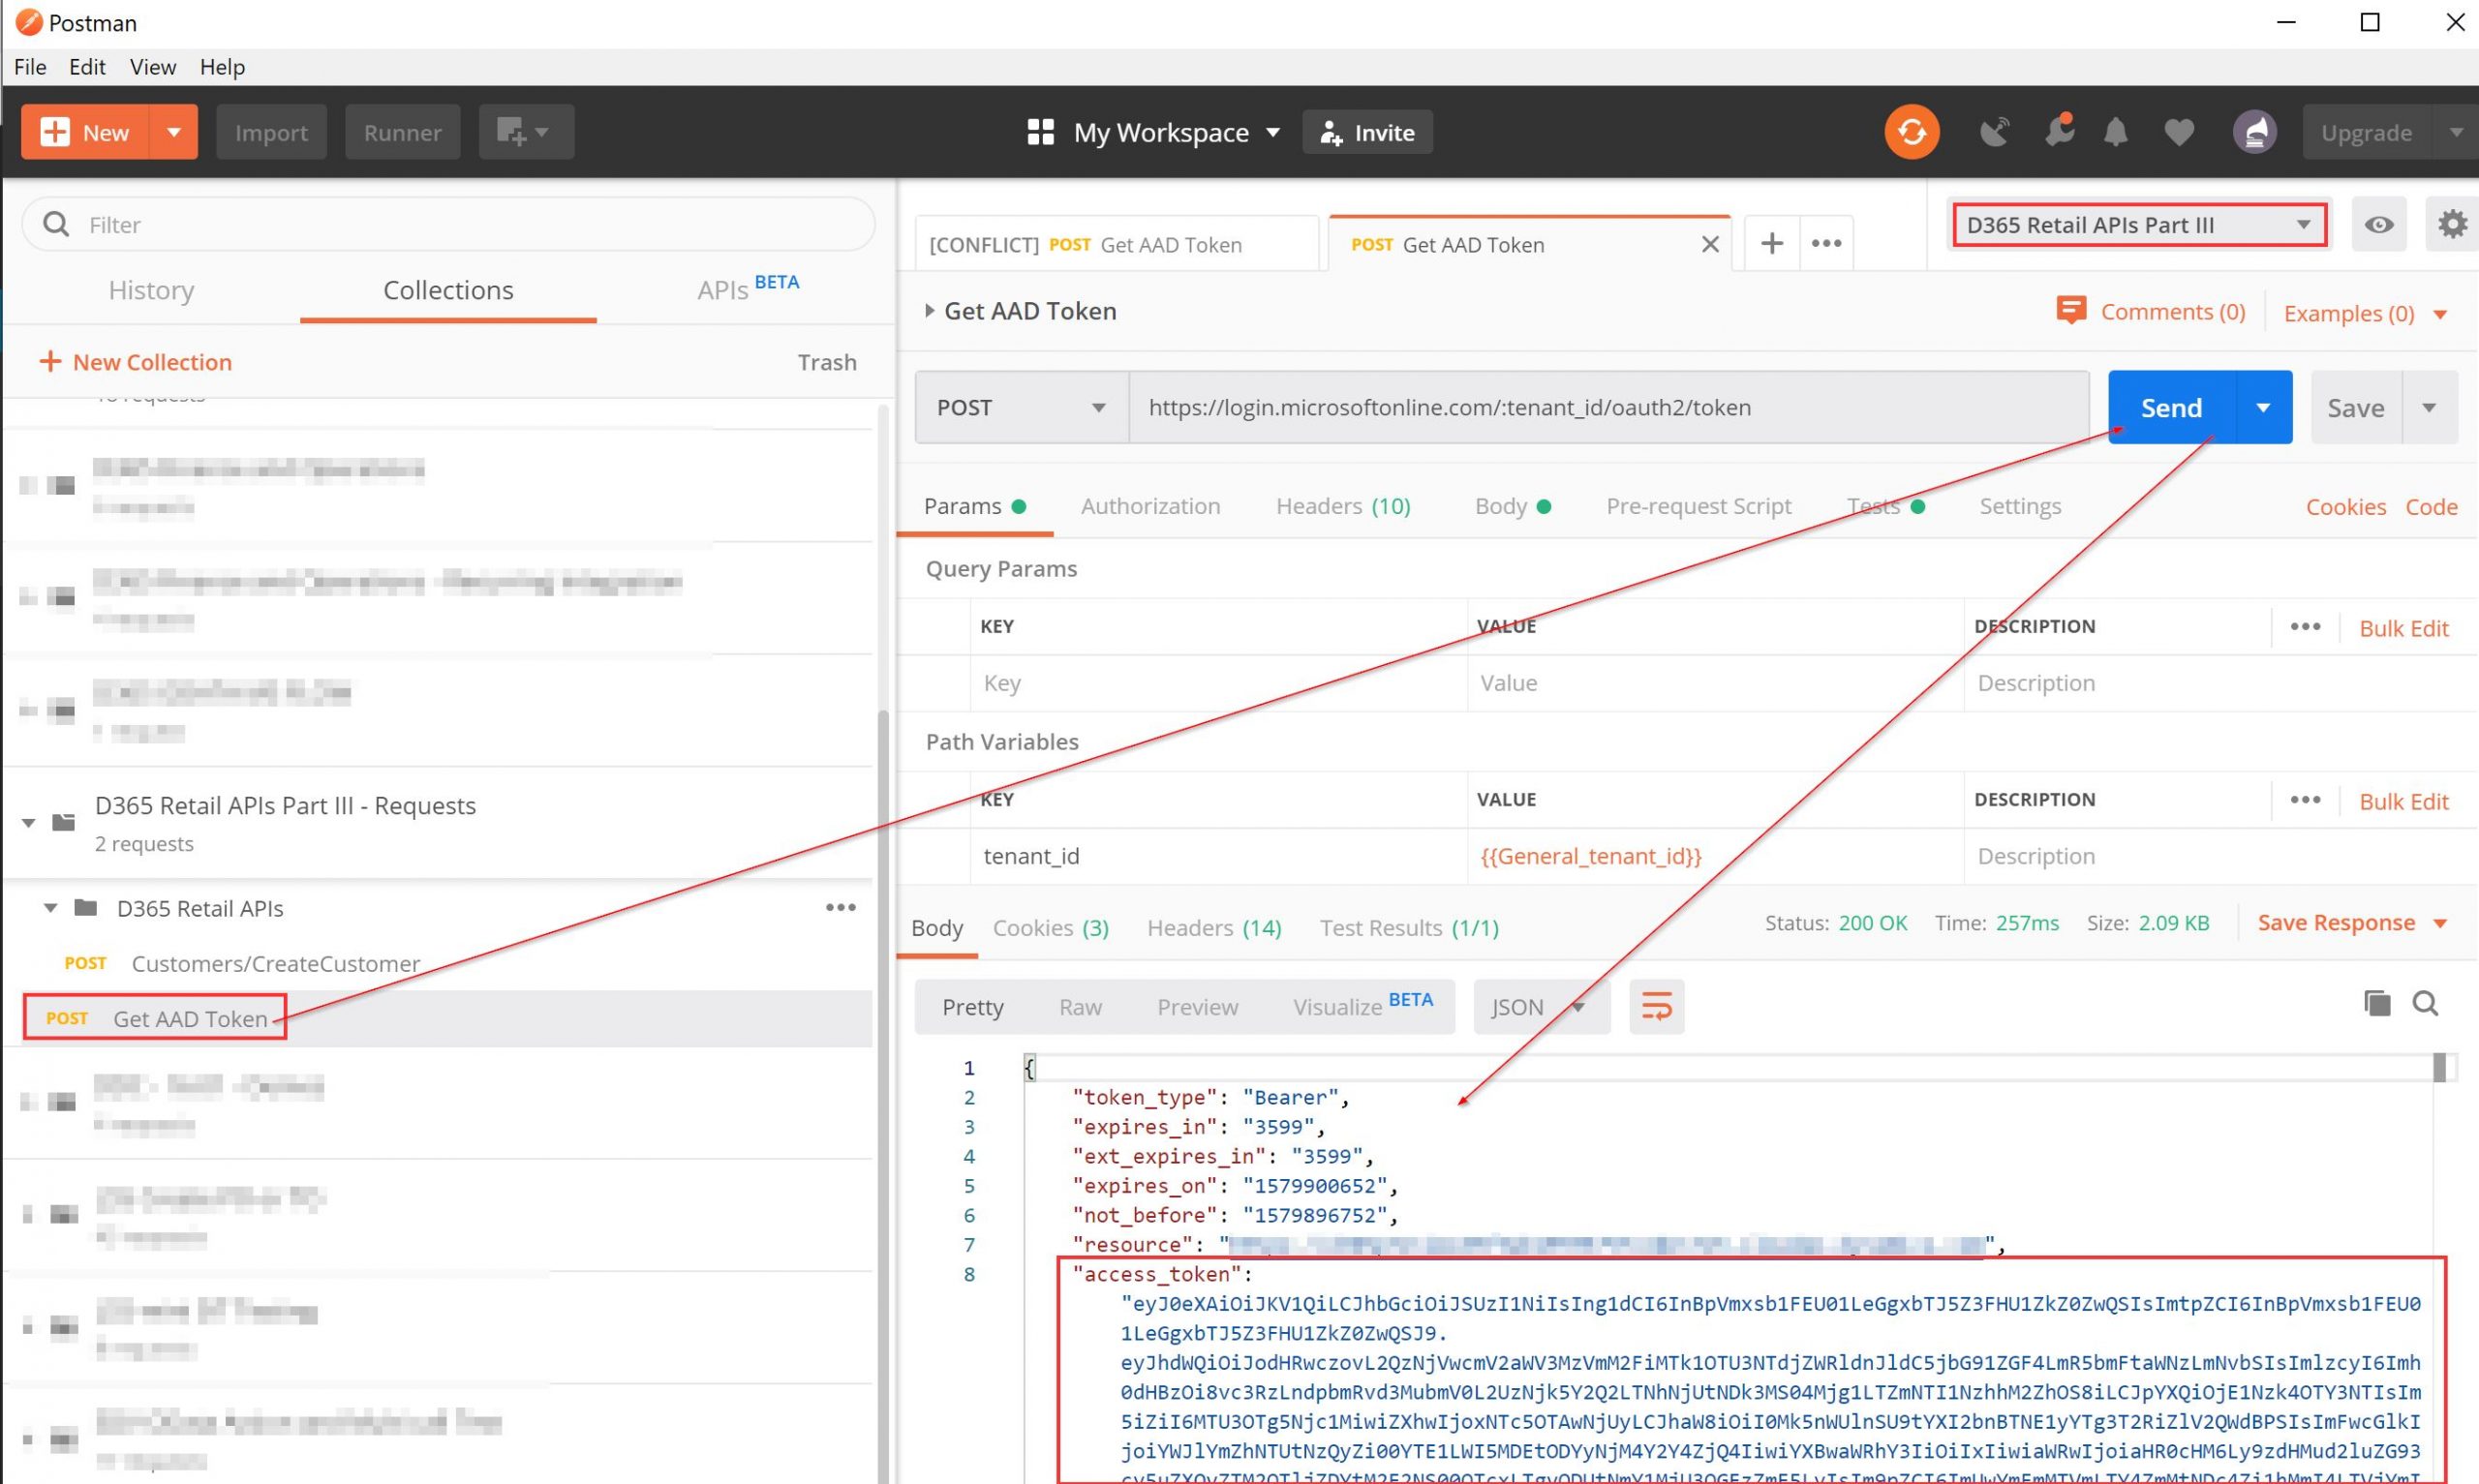
STEP 3 – Create a Customer via the Retail APIs
- Expand the Postman collection D365 Retail APIs Part III – Requests
- Select the POST Get AAD Token operation
- Click the Send button on the right hand side
- Verify you have a Body response which is similar to the response in the picture below
- Expand the subfolder D365 Retail APIs in the D365 Retail APIs Part III – Requests Postman collection
- Select the POST Customers\CreateCustomer operation
- Click Body on the right hand side and optionally update the values such as the name for the customer
- Click the Send button on the right hand side
- Verify that the Body response returns all the details for the account which was newly created – You’ll find this account in the Accounts receivable>Customers>All Customers form in D365 F&O
- When inquiring the new Customer account you’ll find out that many properties such as the Sales tax group, Address book, Credit limit etc. are all populated while you did not input them. This is the heavy lifting done by the standard Retail Business logic which is sitting behind the Retail API. As per this logic, many properties are inherited from the default customer account as configured on the respective Store or Online store. This is a big advantage of using the D365 Retail APIs as over the standard D365 F&O Data Entities: if you use these, you’ll have to fill out almost every single property for the customer which is very time consuming (as it’s “re-inventing the wheel!”). With the Retail APIs, Microsoft have done most of the ’thinking’ for you which also guarantees you’re 100% compatible with the path the D365 Retail product is heading.
- Note: the first time a request to Retail Server is fired in a DEV box, it needs to ‘warm boot’, so the request will take a couple of seconds as opposed to the normal duration of about 150 milliseconds.
6 – Using the D365 Retail APIs with Power Automate (Flow)
Now we know how to consume the Retail APIs which have the Application CommerceRole (read: are suitable for interaction with third-party applications), I’ll know show you how to directly consume the D365 Retail APIs from Microsoft Power Automate (Flow). This will enable you to easily use the Retail APIs in Microsoft Power Apps and will simplify your D365 Retail integration experience.
In my first blog post on the D365 Retail APIs I included this video which demonstrates the use of the D365 Retail APIs by creating customers into D365 F&O from an Office 365 Form. Below I’ll show you step by step how to set this up in Office 365 Forms and Microsoft Power Automate. Here’s an overview of the Architecture:
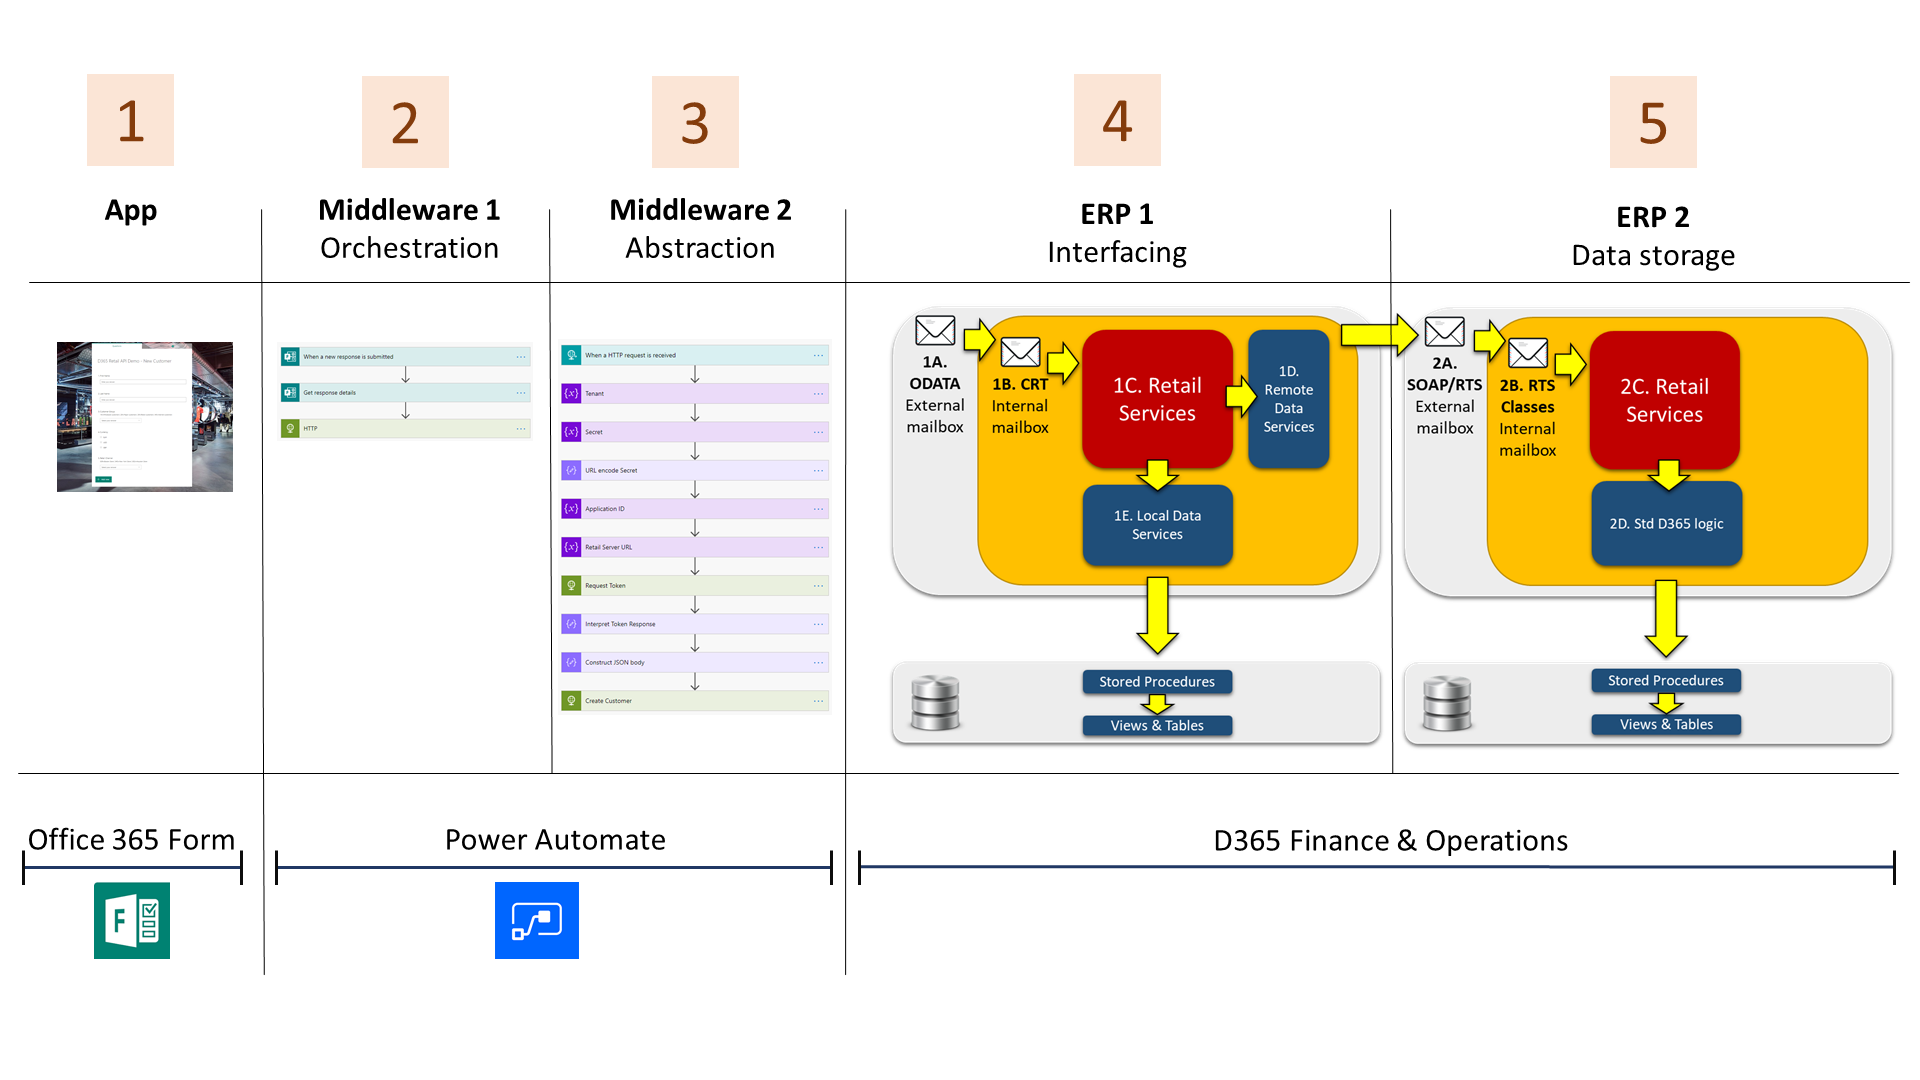
Part 1-3 of this Architecture will be detailed in the steps below. Part 4 and 5 have been detailed in previous blog posts on this topic. Please note that the Office 365 form is linked up with the D365 Retail APIs via 2 Flows as opposed to 1: I have separated the Flow steps which are to request the Access token and to fire the request to D365 into a separate Flow (the Abstraction Flow), so this can be re-used to work with any other client (other than the Office 365 form in this example). Please be aware that we first have to create the Abstraction Flow (Part 3) so we can call it from the Orchestration Flow (Part 2).
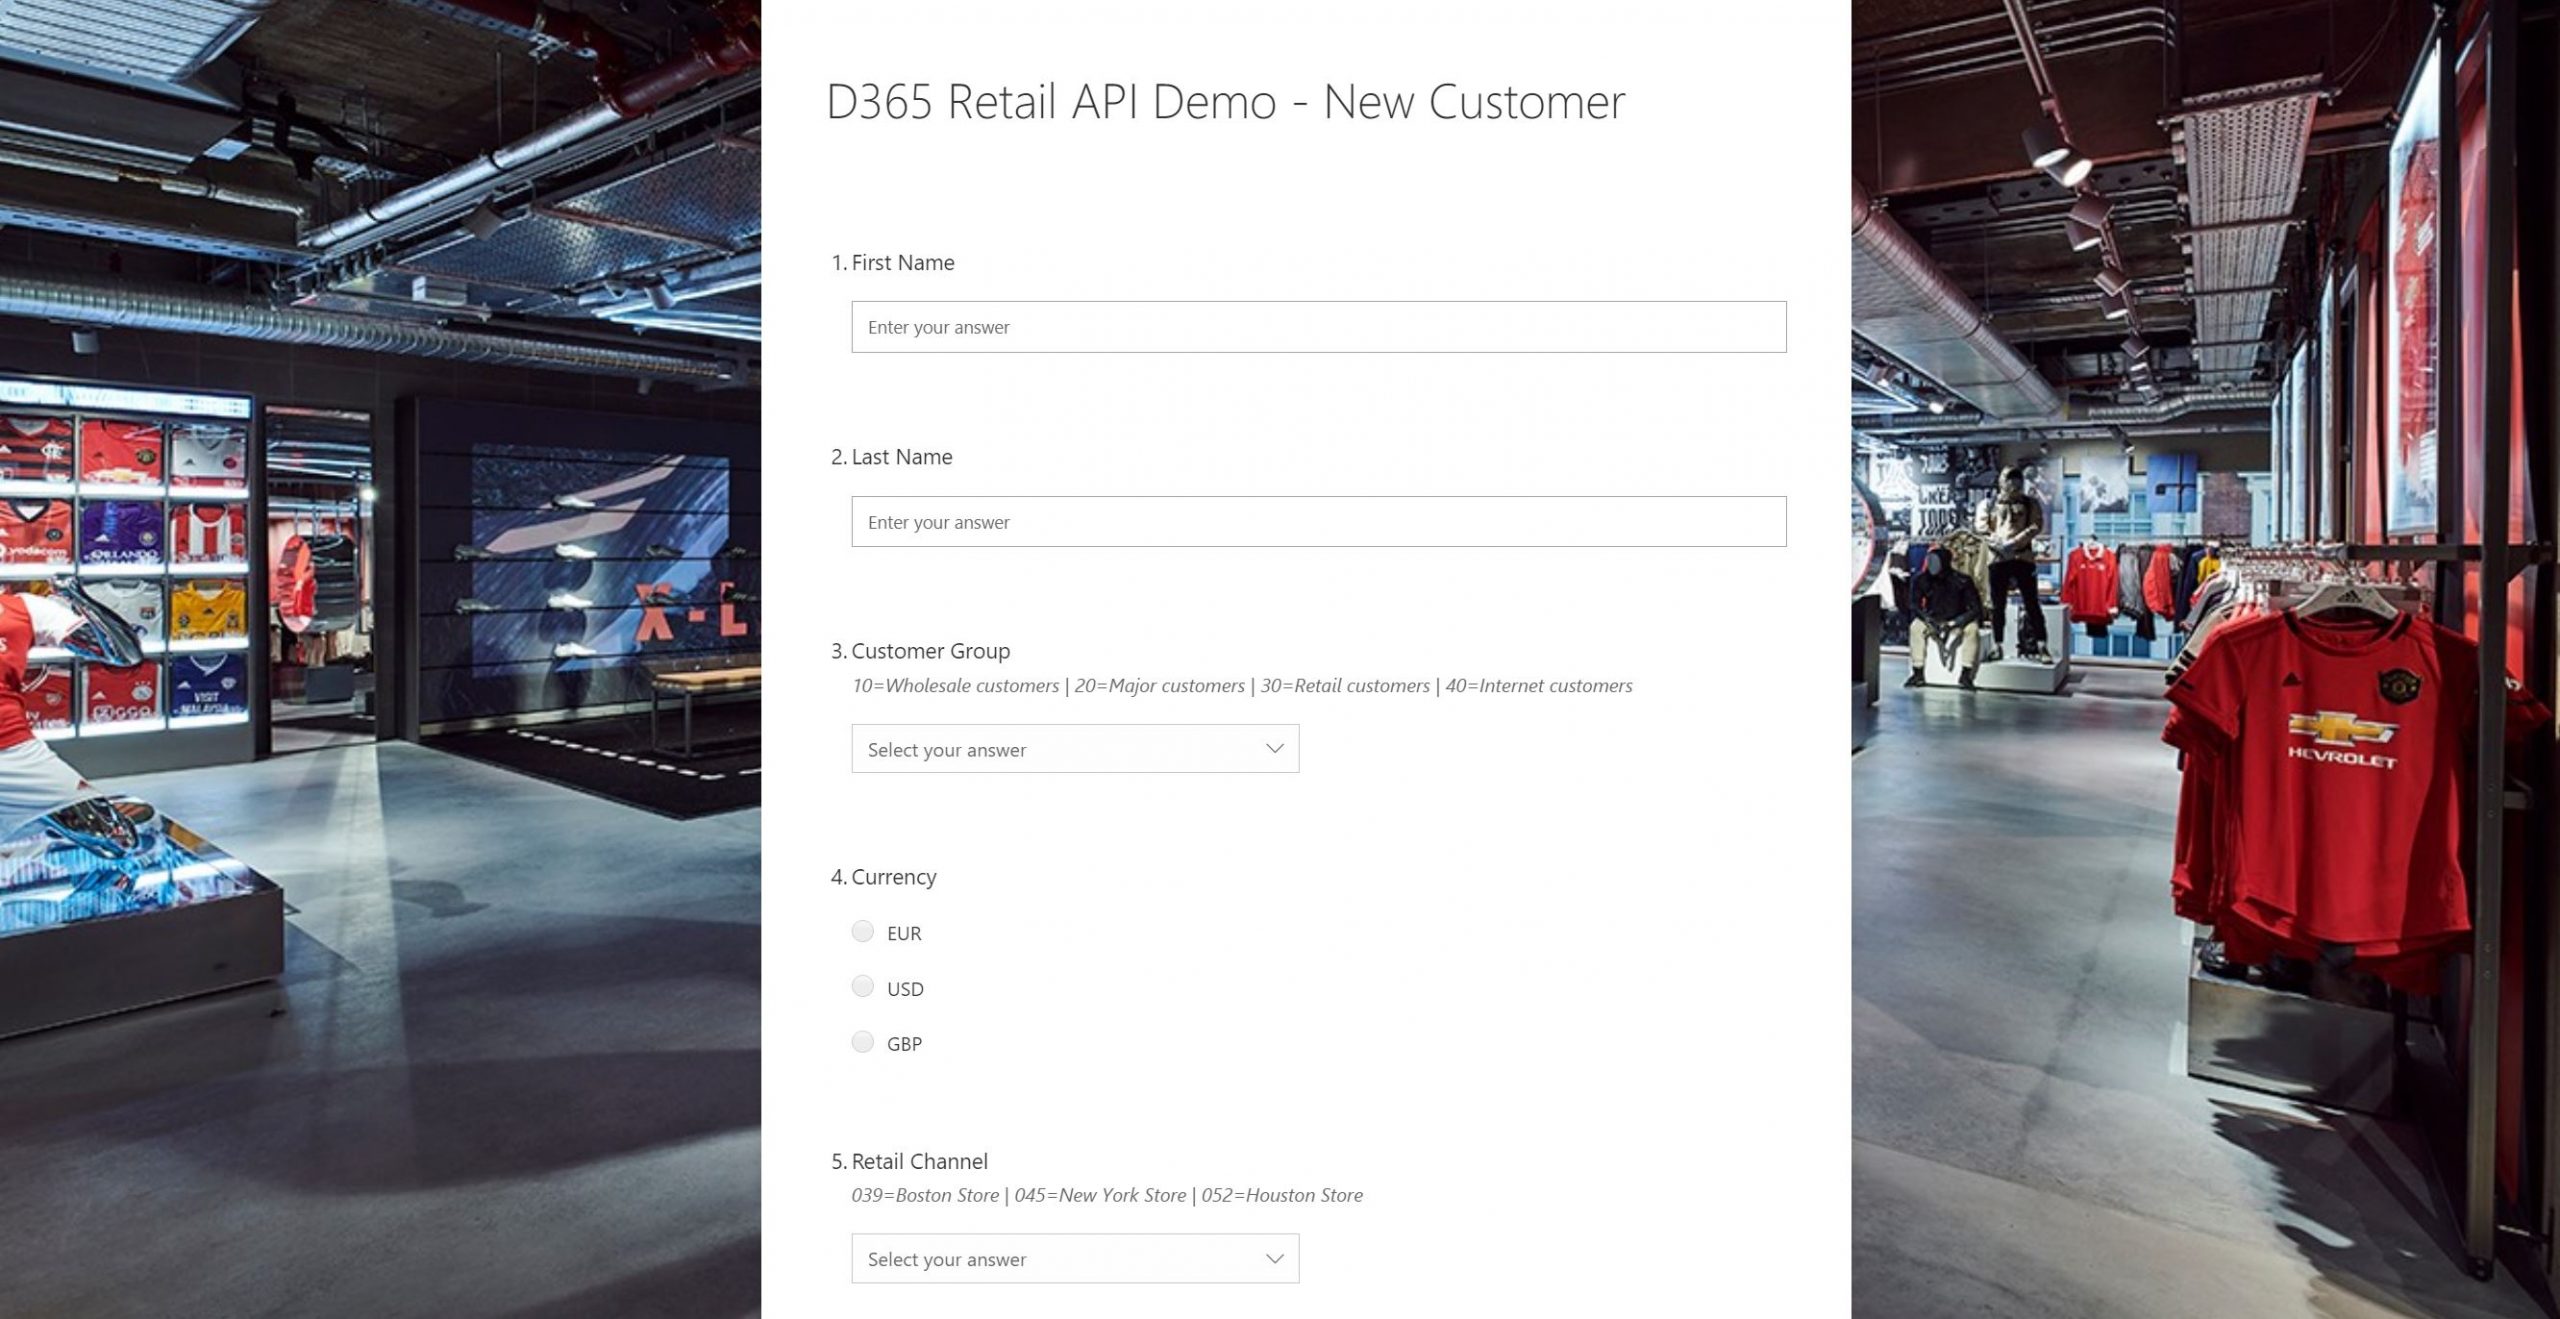
STEP 1 – Create Office 365 Form
- Navigate to Office 365 Forms: https://forms.office.com/Pages/DesignPage.aspx
- Click New form
- Create the form as per the picture below – Please ensure the dropdowns/radio buttons for questions 3-5 actually reflect the values in the subtitle for the question (these match with the D365 Contoso data set)
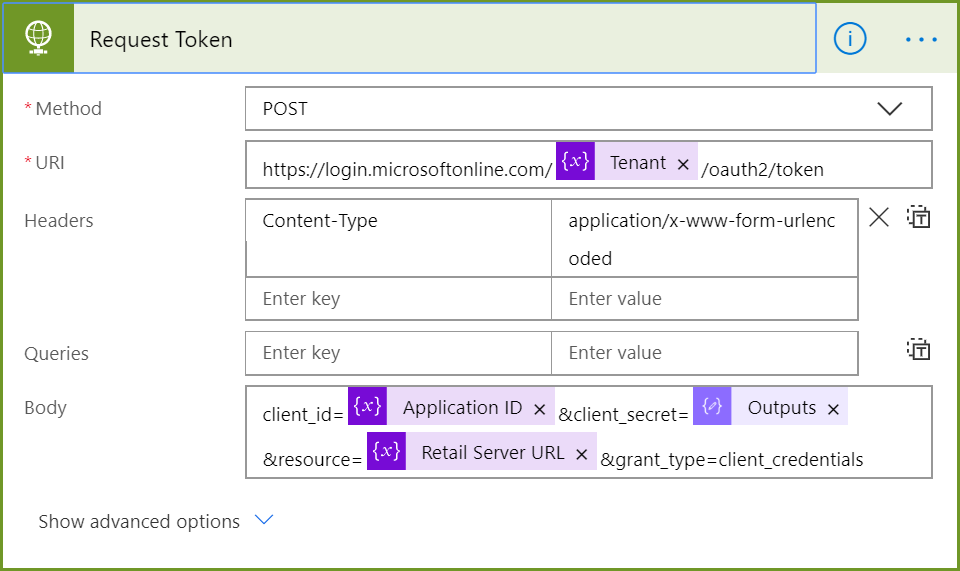
STEP 2 – Create the Abstraction Flow
- Navigate to Microsoft Power Automate: https://emea.flow.microsoft.com/
- Click Solution>New Solution and input and save details for the new Solution
- Click New>New Flow to start a new Flow – name this Flow Retail API_Orchestration
- Build and save the following Flow:
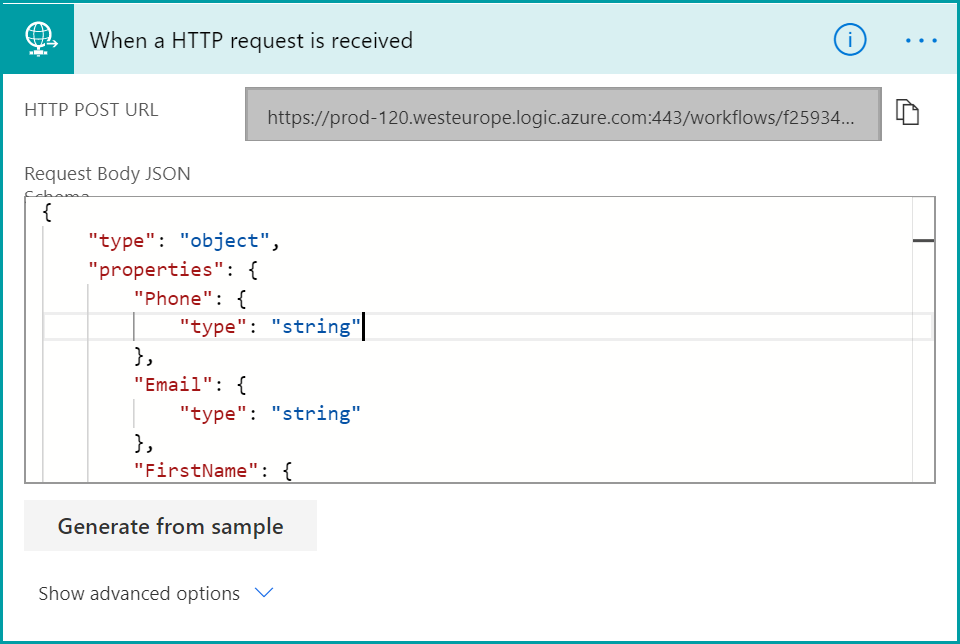
{
"type": "object",
"properties": {
"Phone": {
"type": "string"
},
"Email": {
"type": "string"
},
"FirstName": {
"type": "string"
},
"LastName": {
"type": "string"
},
"CustomerGroup": {
"type": "string"
},
"CurrencyCode": {
"type": "string"
},
"Operating Unit": {
"type": "string"
}
}
}
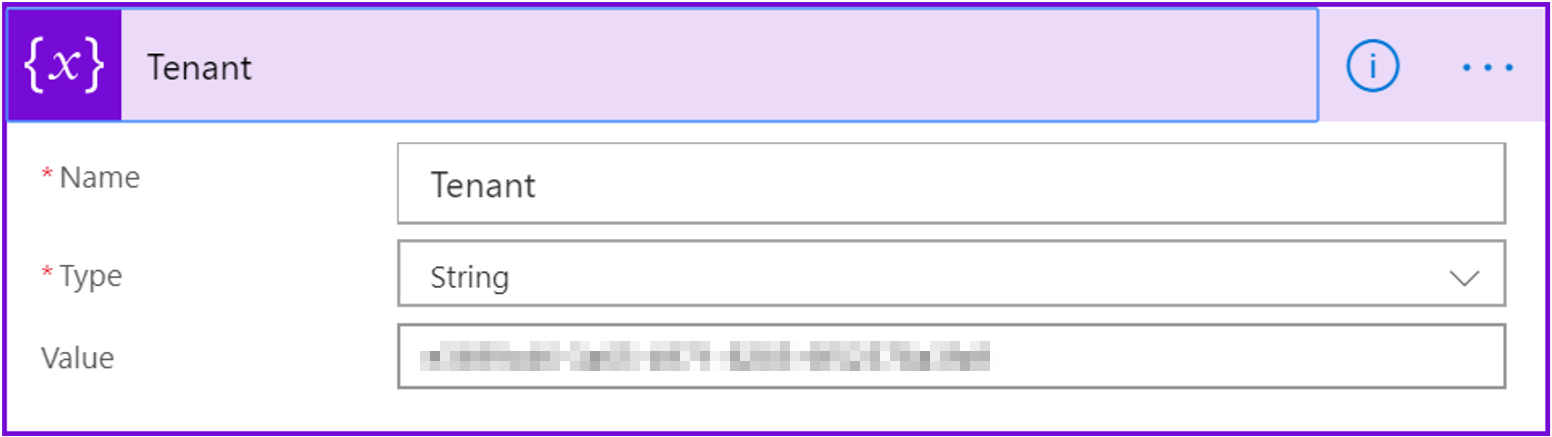
Input the value for your Azure Tenant ID

Input the value for your Application Secret

Input the following formula: replace(replace(variables(‘Secret’),’+’,’%2B’),’=’,’%3D’)
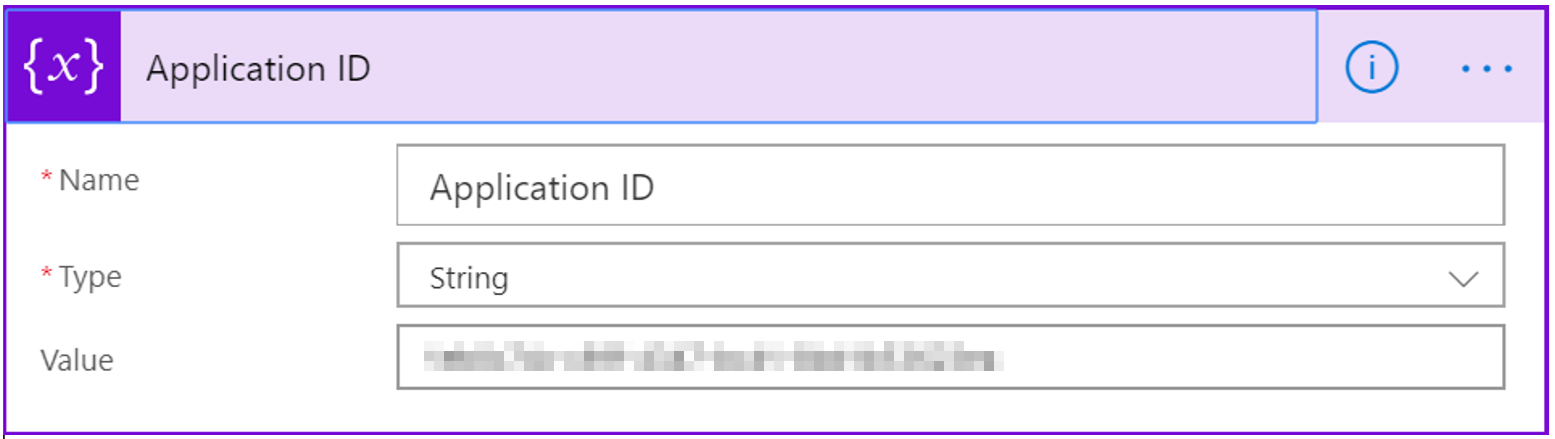
Input the value for your Azure Application ID
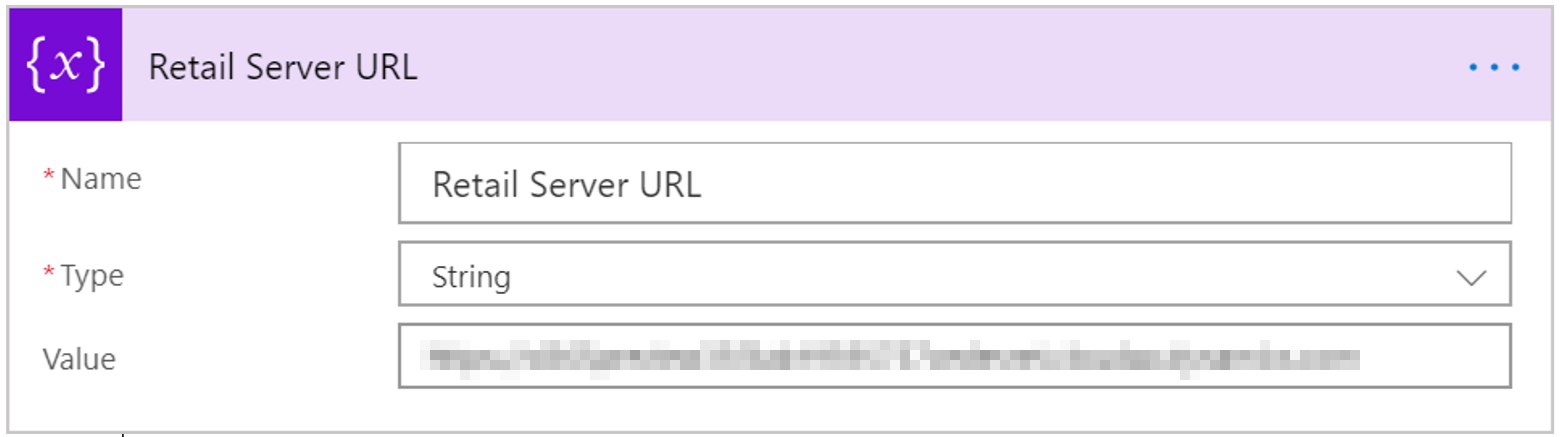
Input your Retail Server URL
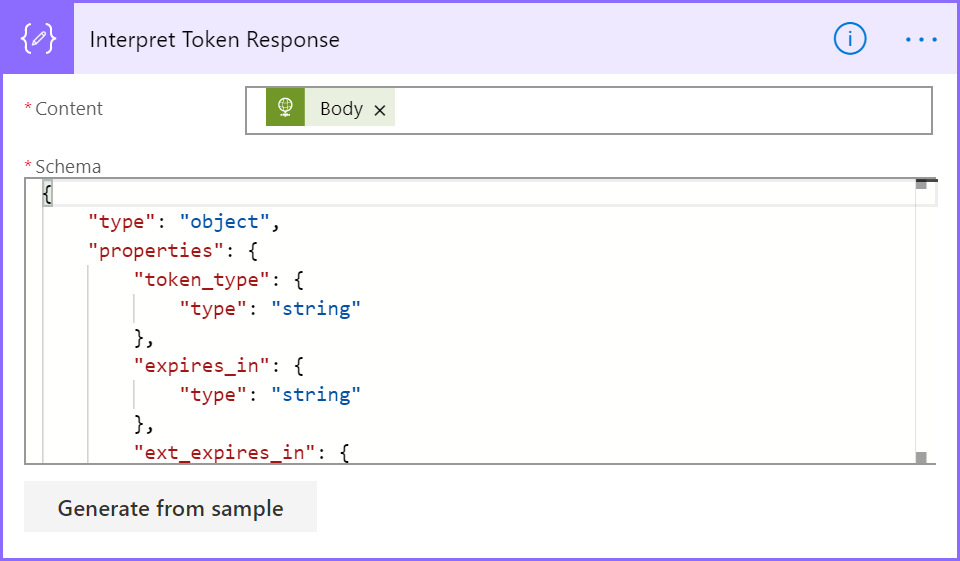
{
"type": "object",
"properties": {
"token_type": {
"type": "string"
},
"expires_in": {
"type": "string"
},
"ext_expires_in": {
"type": "string"
},
"expires_on": {
"type": "string"
},
"not_before": {
"type": "string"
},
"resource": {
"type": "string"
},
"access_token": {
"type": "string"
}
}
}
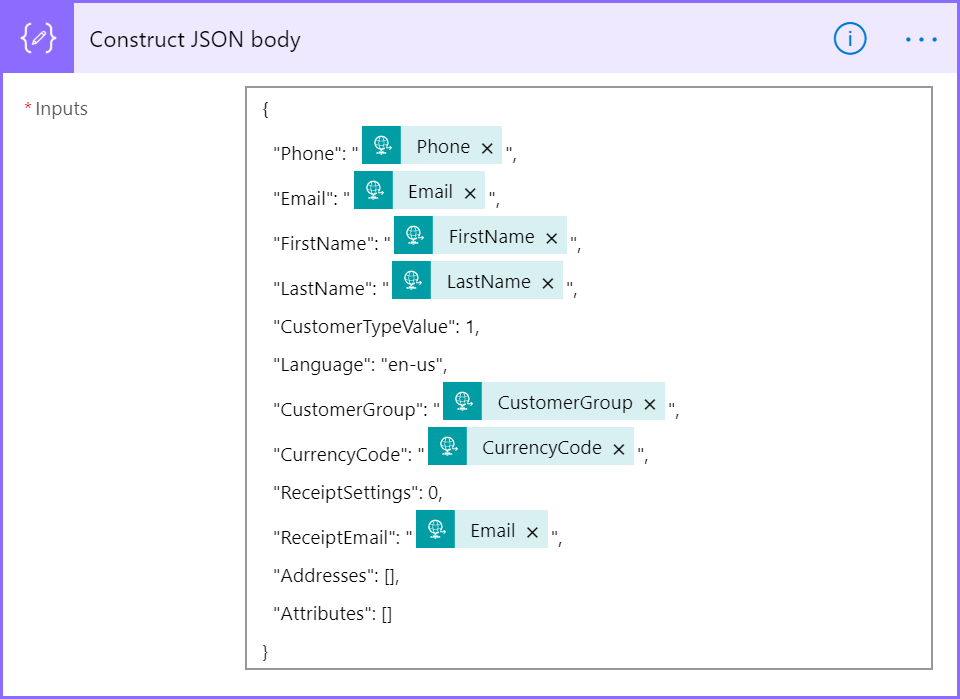
{
  "Phone": "@{triggerBody()?['Phone']}",
  "Email": "@{triggerBody()?['Email']}",
  "FirstName": "@{triggerBody()?['FirstName']}",
  "LastName": "@{triggerBody()?['LastName']}",
  "CustomerTypeValue": 1,
  "Language": "en-us",
  "CustomerGroup": "@{triggerBody()?['CustomerGroup']}",
  "CurrencyCode": "@{triggerBody()?['CurrencyCode']}",
  "ReceiptSettings": 0,
  "ReceiptEmail": "@{triggerBody()?['Email']}",
  "Addresses": [],
  "Attributes": []
}
STEP 3 – Create the Orchestration Flow
- Return to the Solution you created earlier
- Click New>New Flow to start a new Flow – name this Flow Retail API_Office 365
- Build and save the following Flow:

Note: select the Office 365 Form that you created in step 1
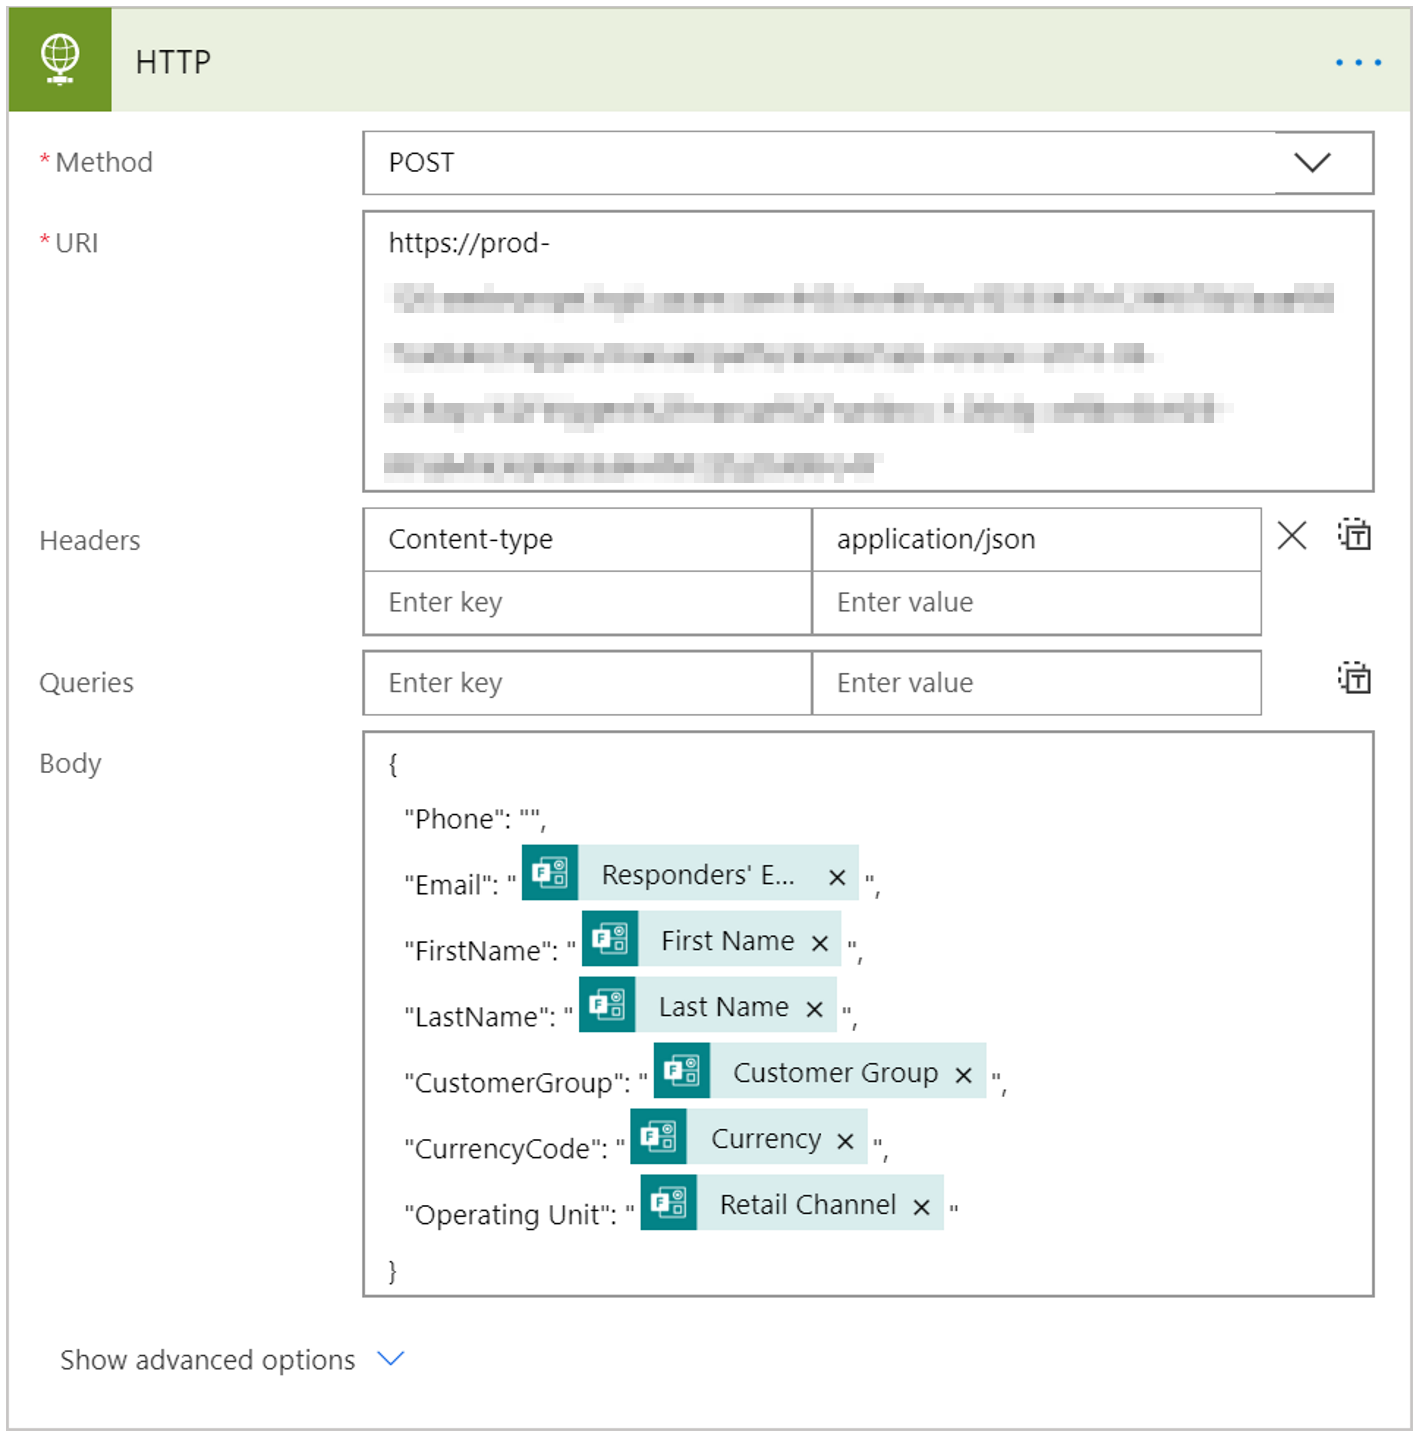
After saving the Abstraction Flow in Step 2, you can copy the URI (URL where this Flow is hosted) – Input this into the URI field
Note: do not forget Content-Type=application/json – It is mandatory when calling an endpoint which represents another Flow
{
  "Phone": "",
  "Email": "@{outputs('Get_response_details')?['body/responder']}",
  "FirstName": "@{outputs('Get_response_details')?['body/reba91af4c50648c4a9a872a441d9a4be']}",
  "LastName": "@{outputs('Get_response_details')?['body/r733d0622029b45e8a860d22fac487e79']}",
  "CustomerGroup": "@{outputs('Get_response_details')?['body/r66eb983cdf354a2ca941b3fc6ac457f4']}",
  "CurrencyCode": "@{outputs('Get_response_details')?['body/r4d4605397f064fb491135d22fc4abcda']}",
  "Operating Unit": "@{outputs('Get_response_details')?['body/r220e4dbf5e4445628734a9c249494375']}"
}
7 – Final Words
I hope the length of this blog post did not discourage you to get started using the D365 Retail APIs. I can tell you from experience that when you reach the point that you’re getting the feeling of Mastering the Retail APIs, you’ll be blown away by the Power and endless Opportunities of this Treasure. You’ll wake up with new ideas on how to use them everyday. Power Apps, Power BI, Power Automate, Power… RETAIL!