
In any of our D365 Implementation Projects, Solution Prototyping is one of the most important aspects of the implementation. On the one hand this Prototyping serves a common Requirement to find a solution which stays closest to Standard D365 – A Requirement often raised by small to medium sized Retailers. On the other hand, Prototyping let us fully understand D365 Retail which allows us to write the best designs for Custom solutions – An exercise which is often required for the bigger Retailers.
Solution Prototyping is most commonly done from ‘Sea level‘: by setting up D365 Retail in different ways to support variations to a Process which are then evaluated (often in playbacks to Business key users) against Process maps and related Requirements. I think this is a very good and effective way to make progress in a project while still making the right Design Decisions.
However, there are cases in which this ‘Sea level’ approach is either very time consuming or not giving you the confidence that you’ve completely bottomed out the D365 Retail capabilities to support a certain process. You probably recognise this from working on complex Processes which are Retail/Omni related, D365 MPOS/commerce customisations or Retail Integrations. For these cases, you need another approach which I’ve named the ‘Engine Room‘ approach: this approach first descends into the ‘Engine Room’ of D365 for Retail to know exactly what happens there before you work yourself up to ‘Sea level’ again to pick the best Solution for your Use Case. In this blog post, I’ll unveil all the tricks to be able to do this quickly and effectively.
Note: please ensure to familiarise with the D365 Retail API Architecture as per Part I of this series on D365 Retail APIs before you read any further.
1 – Approach
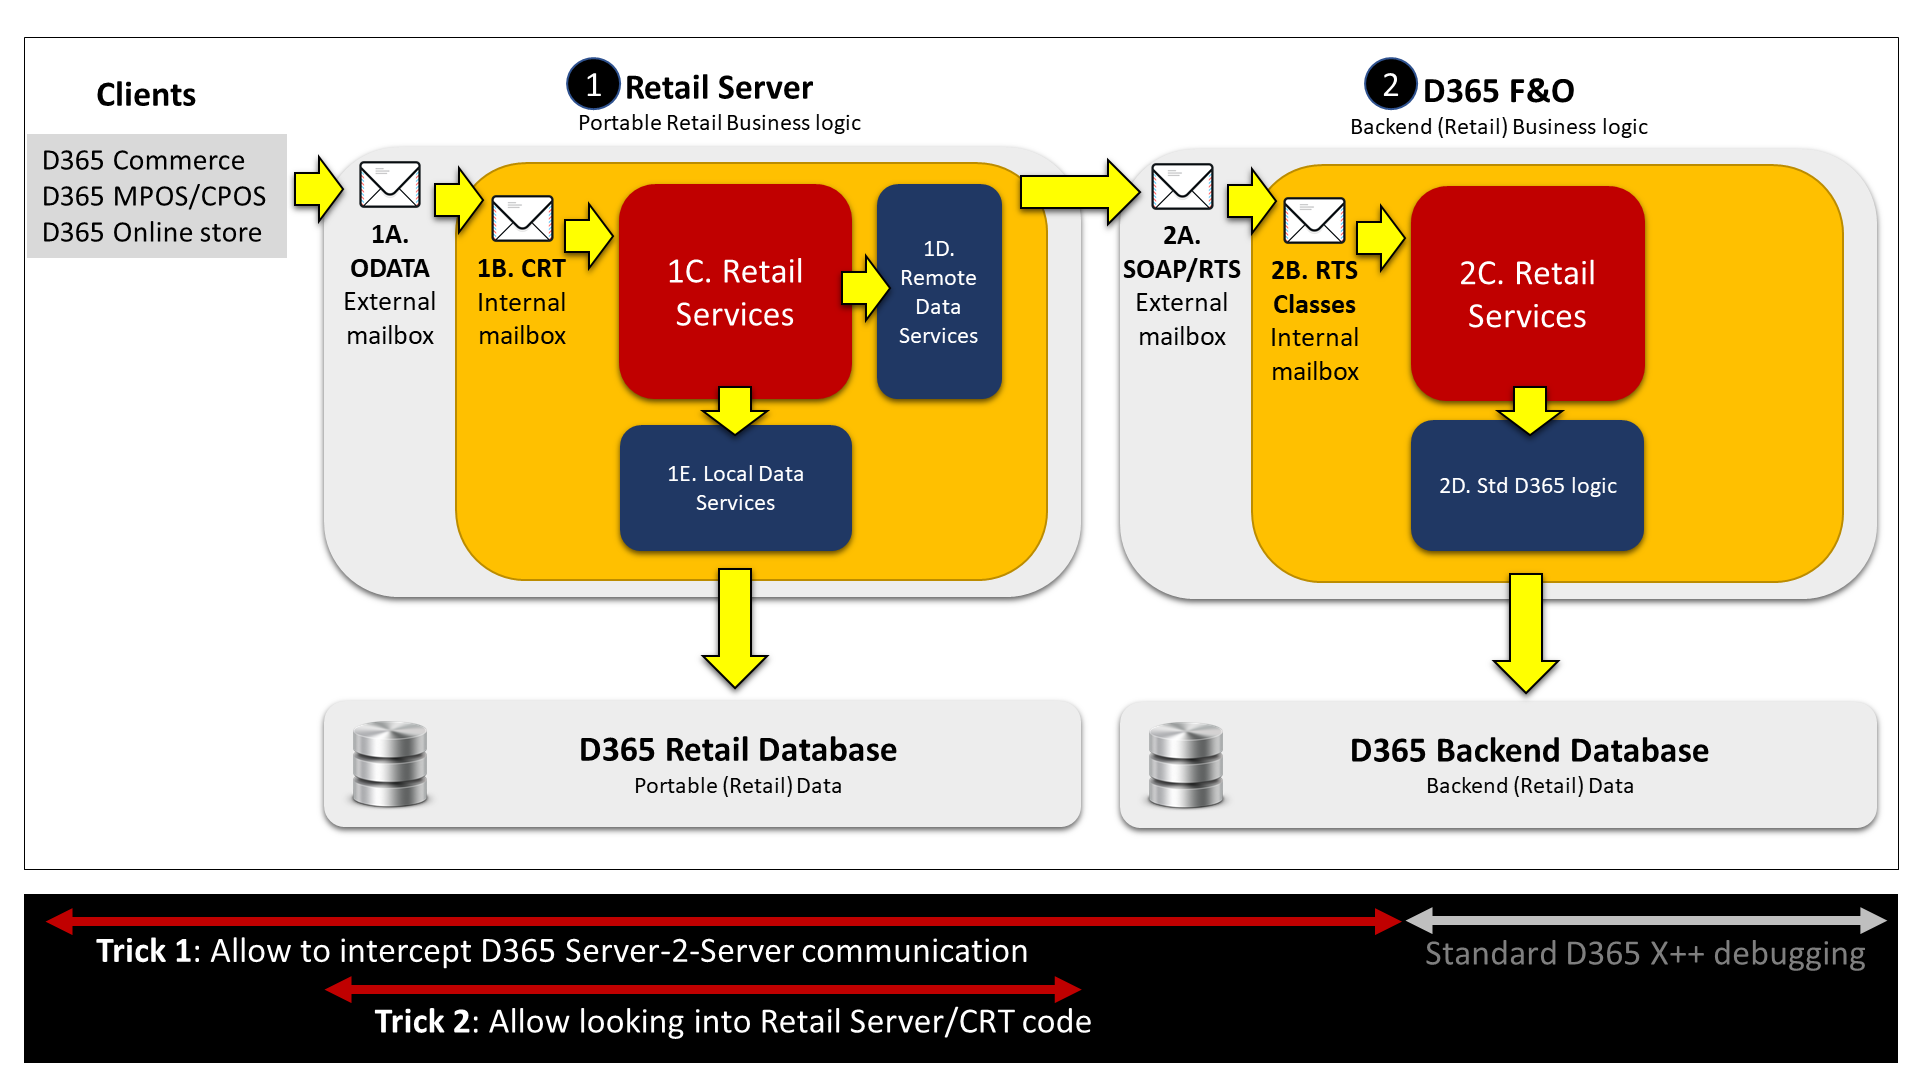
Picture 1 below depicts my ‘Engine Room’ approach:
- Trick 1 – IIS Setup and Fiddler : we’re going to make a modification to the IIS/authentication to allow to intercept all traffic between all D365 Retail IIS Services with Fiddler – See this picture on the D365 Retail supporting IIS services you’ll typically find on a D365 F&O DEV box.
- A. The D365 Commerce and D365 SharePoint Online store >> TO >> D365 Retail Server
- B. D365 Cloud POS (CPOS) to >> TO >> D365 Retail Server (note: this can also be done without the trick – see blog post by our Retail Champion Kurt Hatlevik here)
- C. D365 Retail Server >> TO >> D365 Real Time Service (RTS)
- Trick 2: .NET Reflector: we’ll install .NET Reflector to be able to look inside D365 Retail Server, Commerce Run Time (CRT) and all related portable Retail Business Logic
- D365 AOT: we’ll use Visual Studio/AOT (no tricks needed here :)) to look into the D365 backend Real Time Service class logic hit by D365 Retail Server
- D365 X++: Debugging: optionally we can debug the D365 code beyond the RTS classes to know what’s happening further down the road in D365 (Business as usual ;-))
2 – Setup
2.1 – Trick 1: IIS Setup and Fiddler
Note: only a apply this trick on a D365 DEV box!
| # | Step | Reference |
| 1 | RDP into the D365 VM | Use the admin account + password available through LCS |
| 2 | Follow these steps to install (if not already installed) and configure Fiddler on the VM. | Link |
| 3 | Open Internet Information Services (IIS) | |
| 4 | Navigate to the Application Pool for Retail Server > Advanced settings -> Change Identity from “Network Service” to the admin account (requires password to be entered). Note: this is the admin account which is available for the environment on LCS and which is used to RDP into the environment |  |
| 5 | If you’re working with CPOS, this is sufficient to be able to intercept all end-to-end CPOS>Retail Server>RTS traffic. | If you’re working with the SharePoint or Commerce storefront, then repeat step 4 for the Application Pool representing the storefront |
| 6 | I’d recommend to reboot the environment after above steps |
2.2 – Trick 2: Install and Setup .NET Reflector
| # | Step | Reference |
| 1 | RDP into the D365 VM | RDP with the admin account + password available through LCS |
| 2 | Download and install .NET Reflector (run as Administrator) | Link Note: this tool is not free, but has a 14-day trial – I prefer the standalone edition – There’s also an Add-In for Visual Studio |
| 3 | Open Internet Information Services (IIS) – Navigate to Sites and select RetailServer. Click right mouse button > Explore. This will open Windows Explorer for the folder which hosts the RetailServer website | 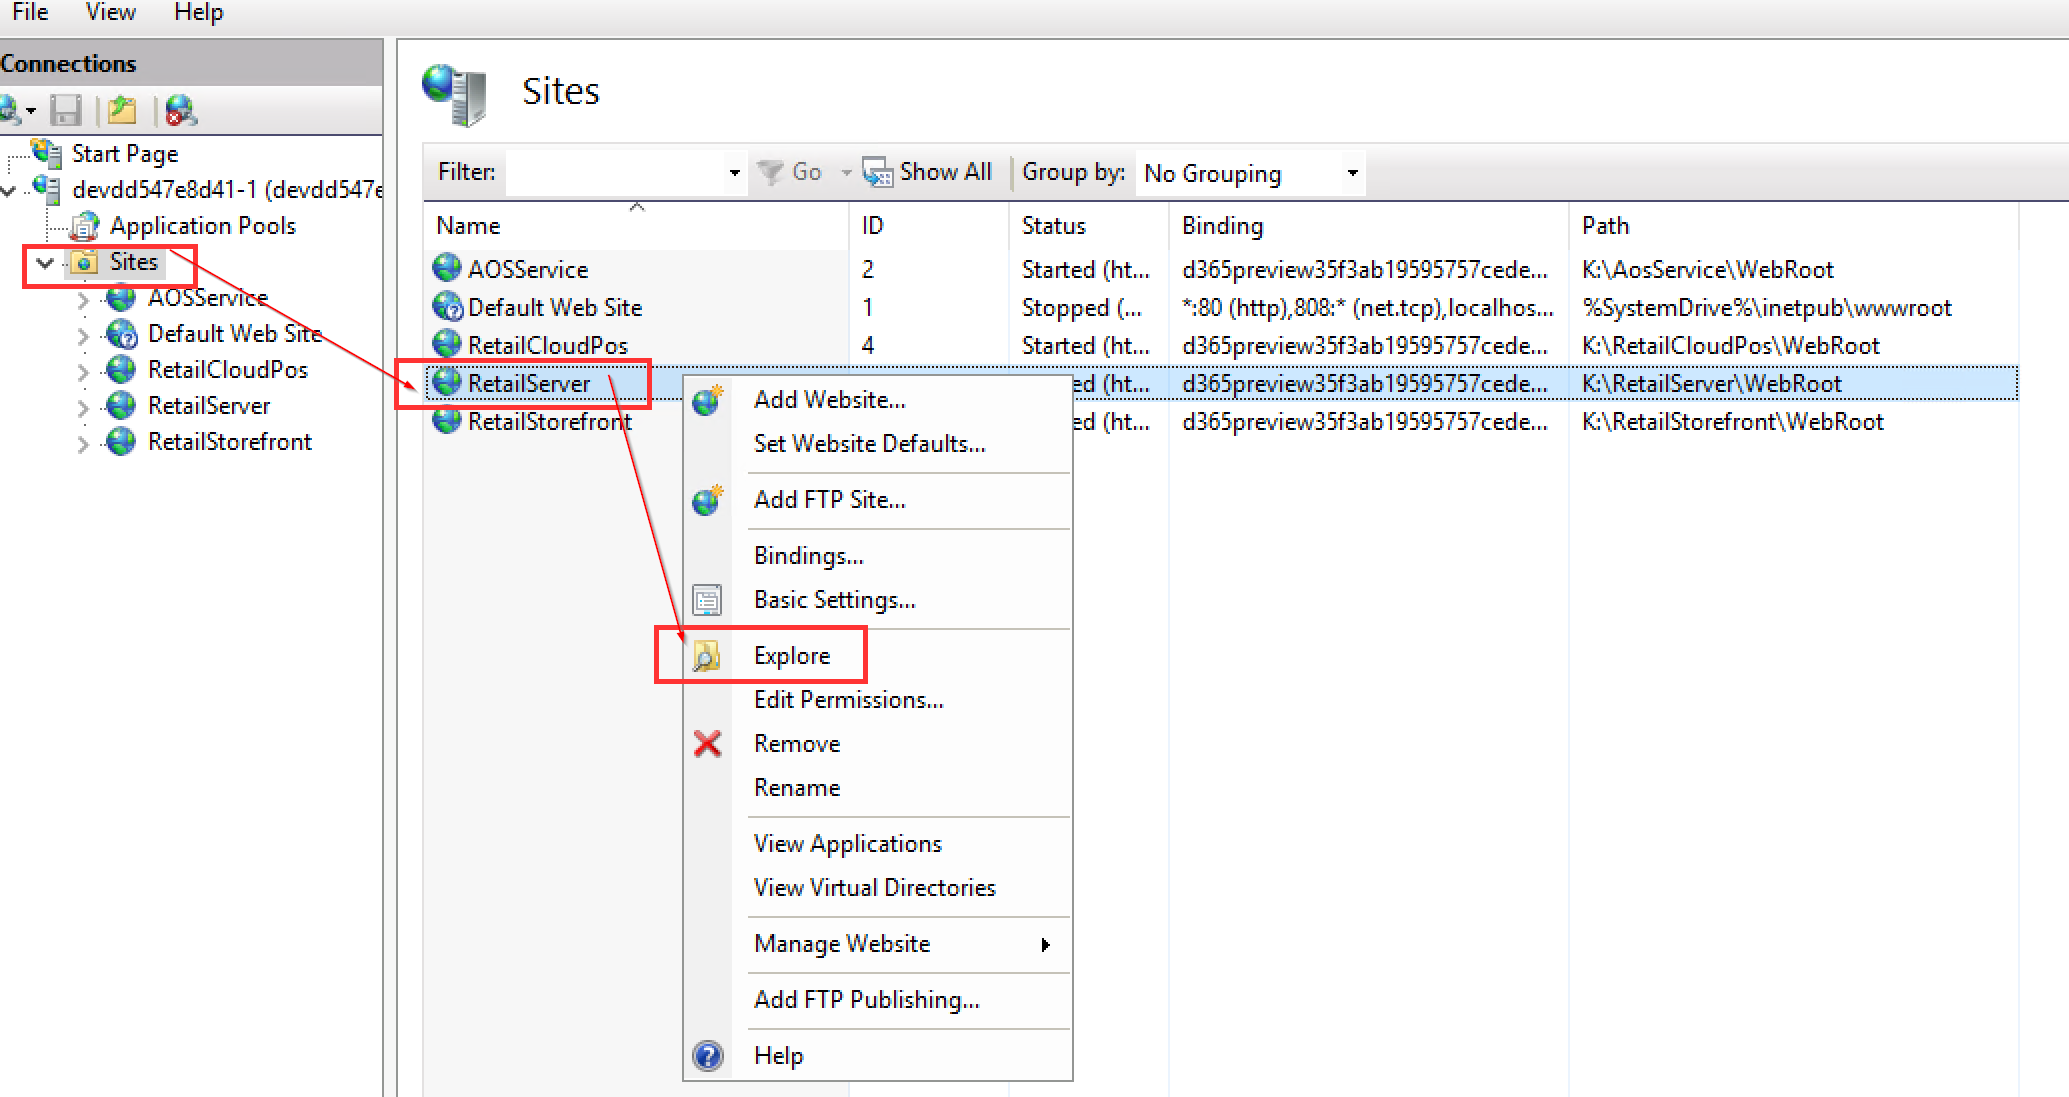 |
| 4 | Double click on the Bin folder and copy the path to the folder | e.g. K:\RetailServer\WebRoot\bin |
| 5 | Open .NET Reflector and click File > Open Assembly – Paste the path to the RetailServer folder as copied in the previous step into the File name textbox. Click Open to open the path | |
| 6 | Select one of the DLLs and click <CTRL><A> to select all DLLs – Click Open to open the DLLS |  |
| 7 | Navigate to the following entry:Microsoft.Dynamics.Retail.RetailServer\Microsoft.Dynamics.Retail.RetailServerLibrary\ Microsoft.Dynamics.Retail.. This entry represents the Retail Sever “External mailbox” (Retail ODATA end points) – You’ll recognise all Retail operations here! This will always be your starting point for any analysis, so keep this entry in mind (!) |  |
3 – Analyse a Real-life example: create a Customer through the D365 Retail APIs
In Part I of this series on D365 Retail APIs I used Microsoft Forms to create a Customer into the D365 backend utilising the D365 Retail APIs in real time. Now, we’ll dive into the ‘Engine Room‘ of for this process of customer creation. As you’ll see this will unveil all aspects of Customer sign up including how the Retail Setup and Parameters in the D365 backend guide this process.
3.1 Intercept the D365 Retail communication with Fiddler
- Ensure to have Fiddler and .NET Reflector open (open as Administrator).
- Fire up a D365 Retail Cloud POS and navigate to Current Transaction > Add Customer > Create new Customer
- Clear all sessions from Fiddler
- Fill out the customer details and hit the Save button
- Wait until the customer is fully saved and then open Fiddler – Inquire the following results:
CPOS >> TO >> Retail Server communication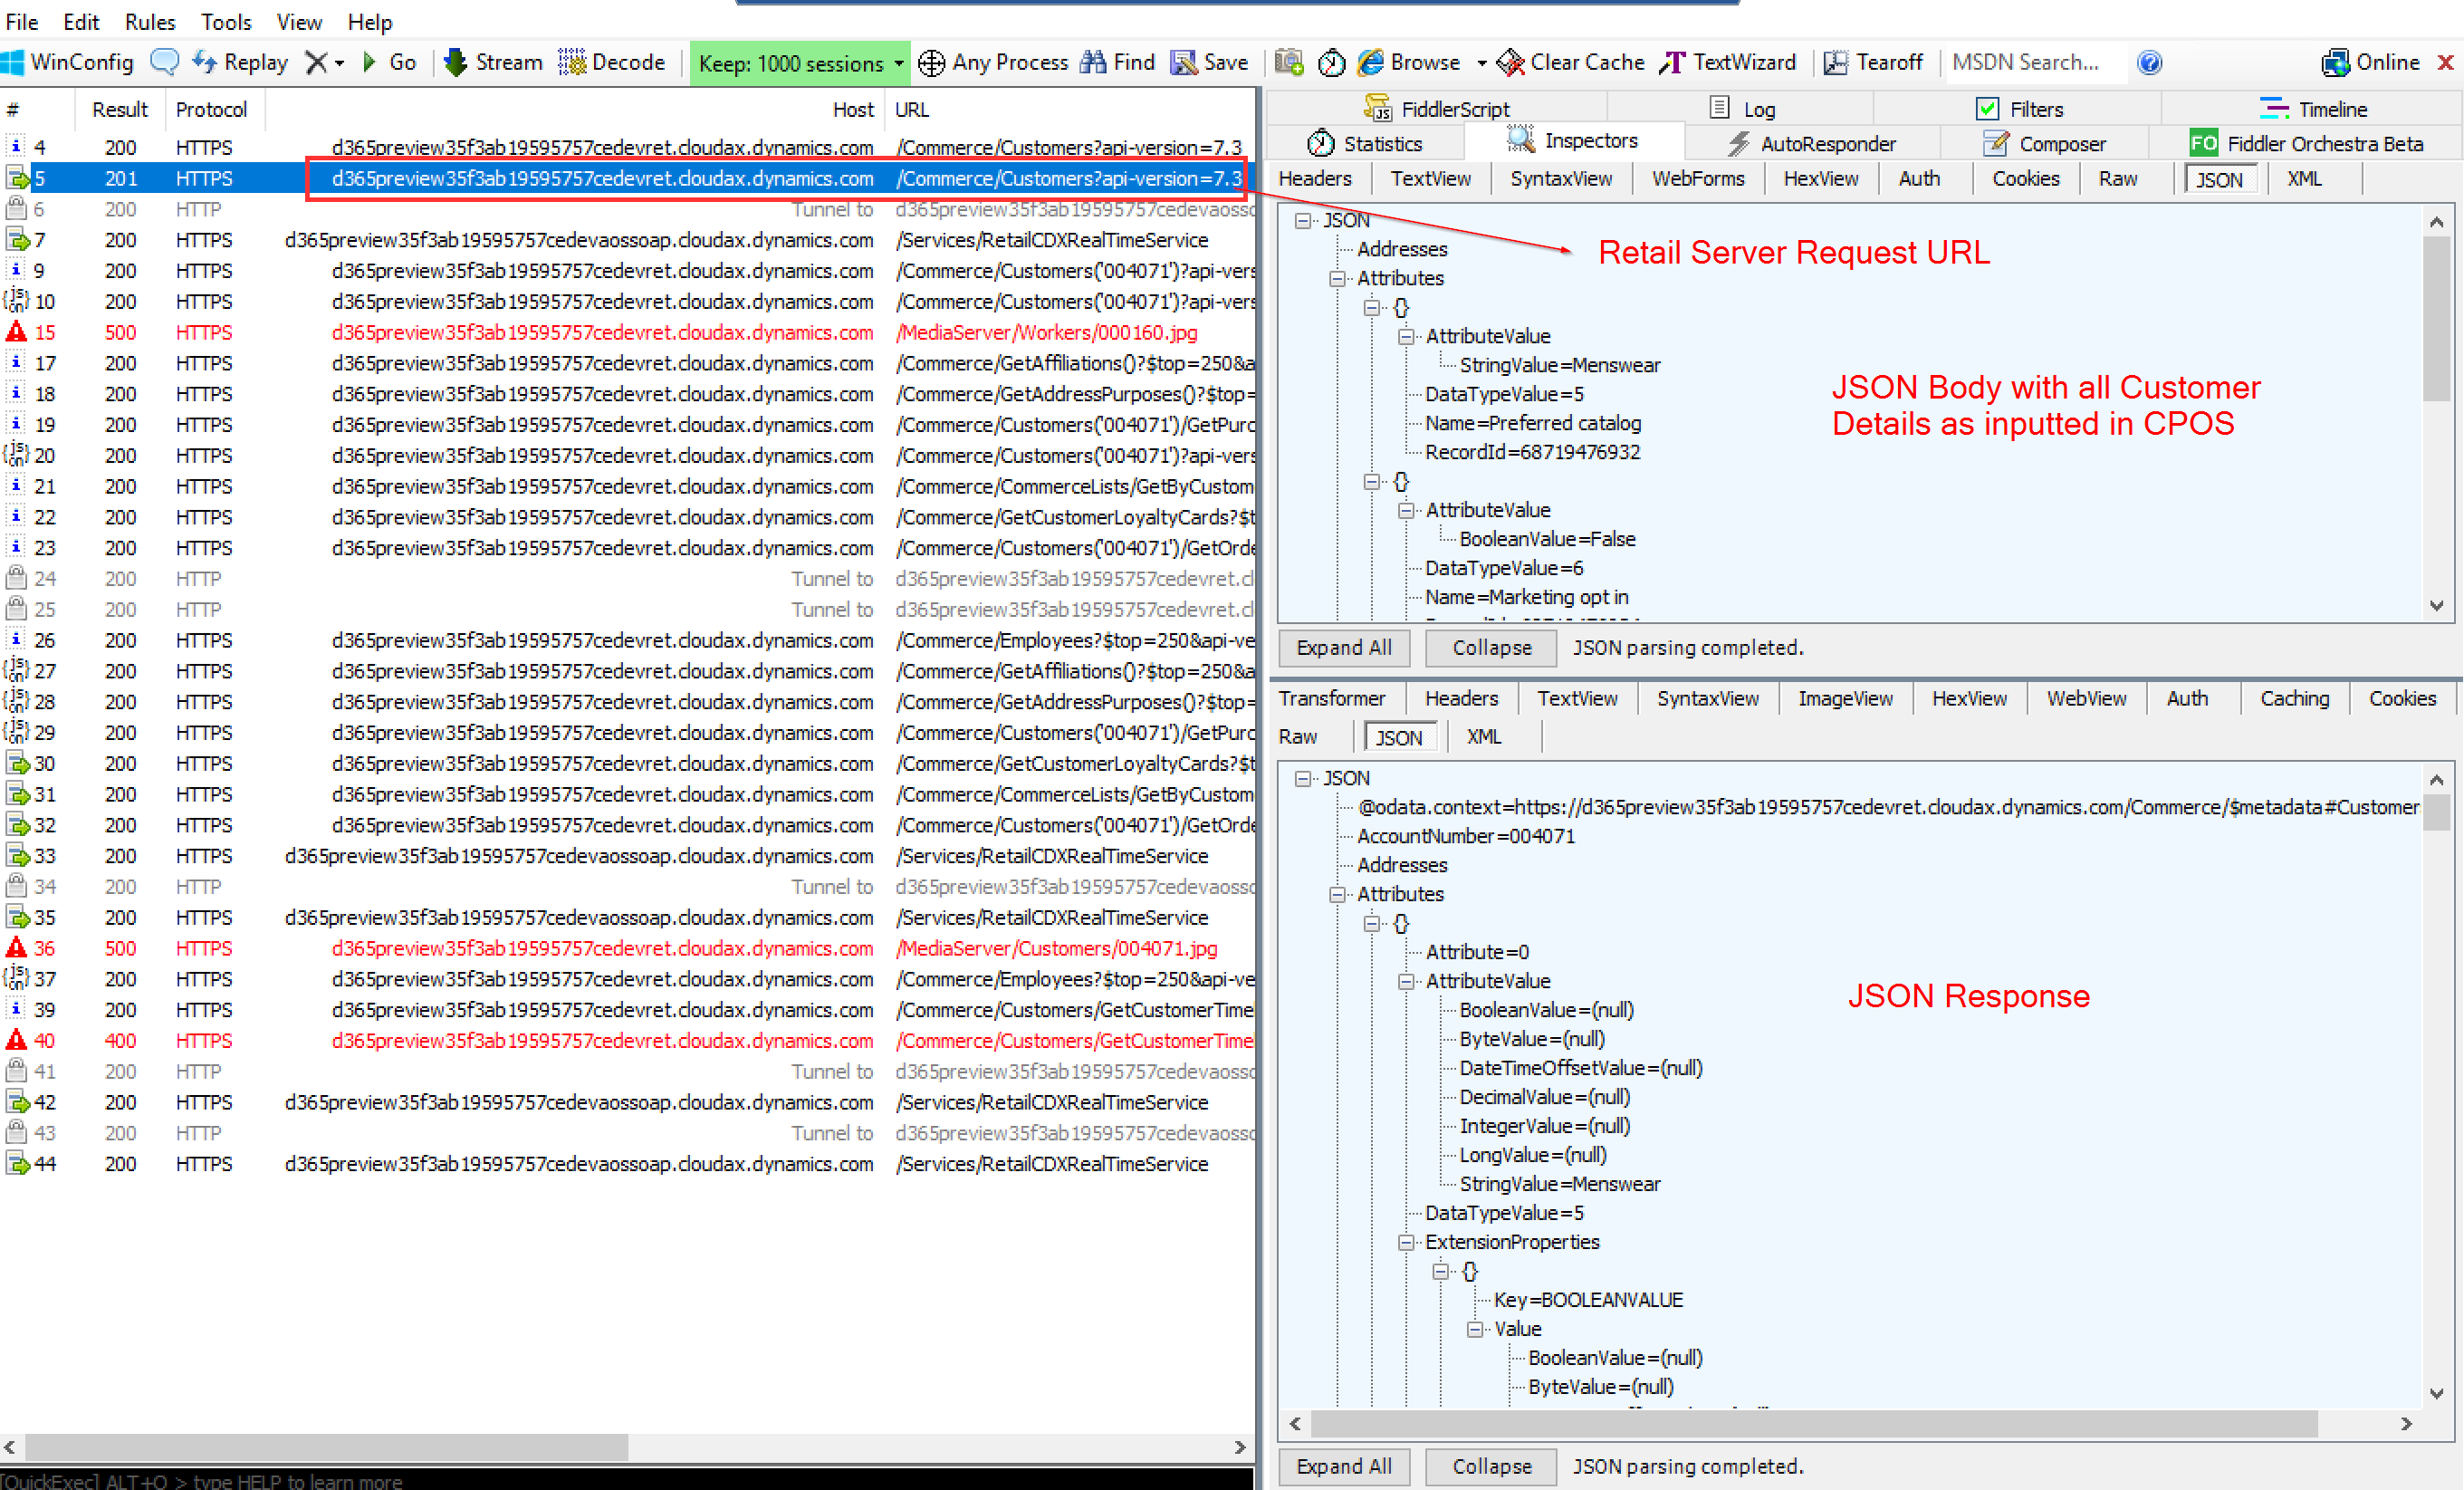
Retail Server >> TO >> RTS communication (note: this version D365 V10.0.8 PEAP)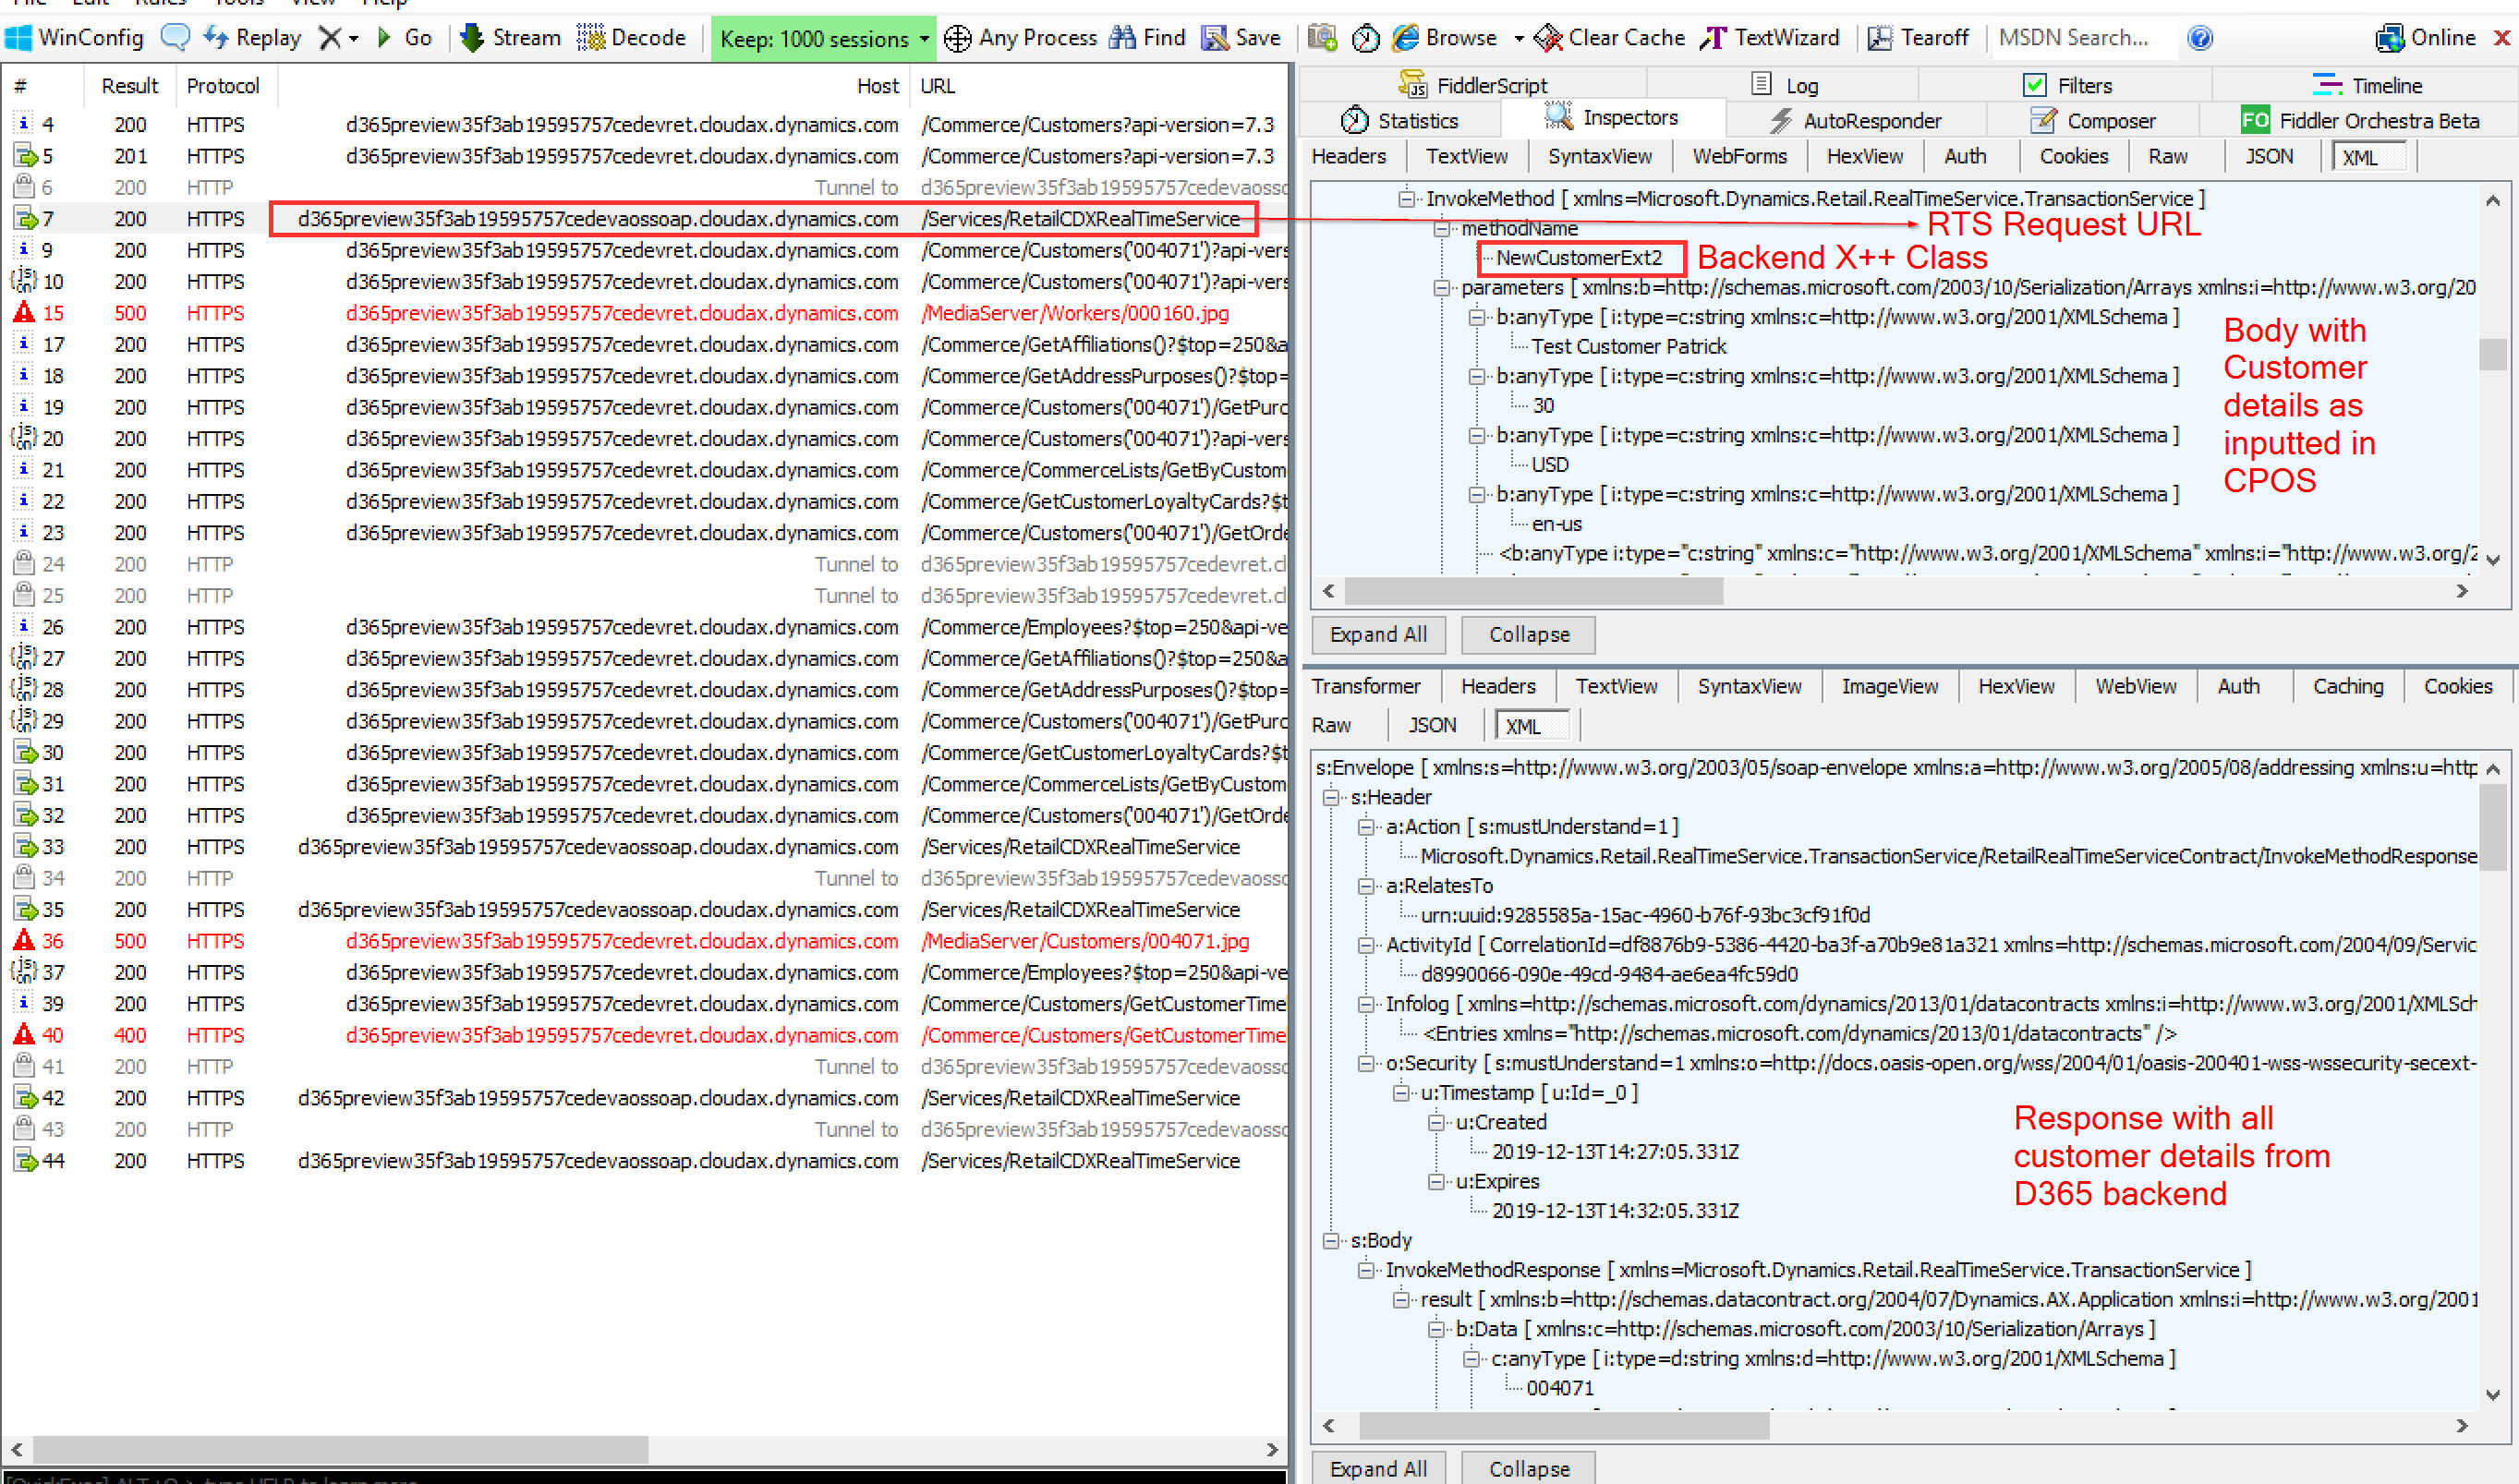
- We can derive the following information from the Fiddler input:
- CPOS is making a request to <Retail Server URL>/commerce/customer in JSON format
- Retail Server is making a request to <D365 SOAP URL>/Services/RetailCDXRealTimeService in XML format
- RTS The SOAP service forwards the request to the RetailTransactionService.NewCustomerExt2 method in D365 X++
3.2 Analyse what happens within Retail Server
Now we have all the entry points for analysis, let’s dive into related Retail Server Business Logic underpinning the request from Cloud Pos to Retail Server:
- Open .NET Reflector and the Retail Server DLLs as explained in paragraph 2
- Navigate to the Customers ODATA Controller:
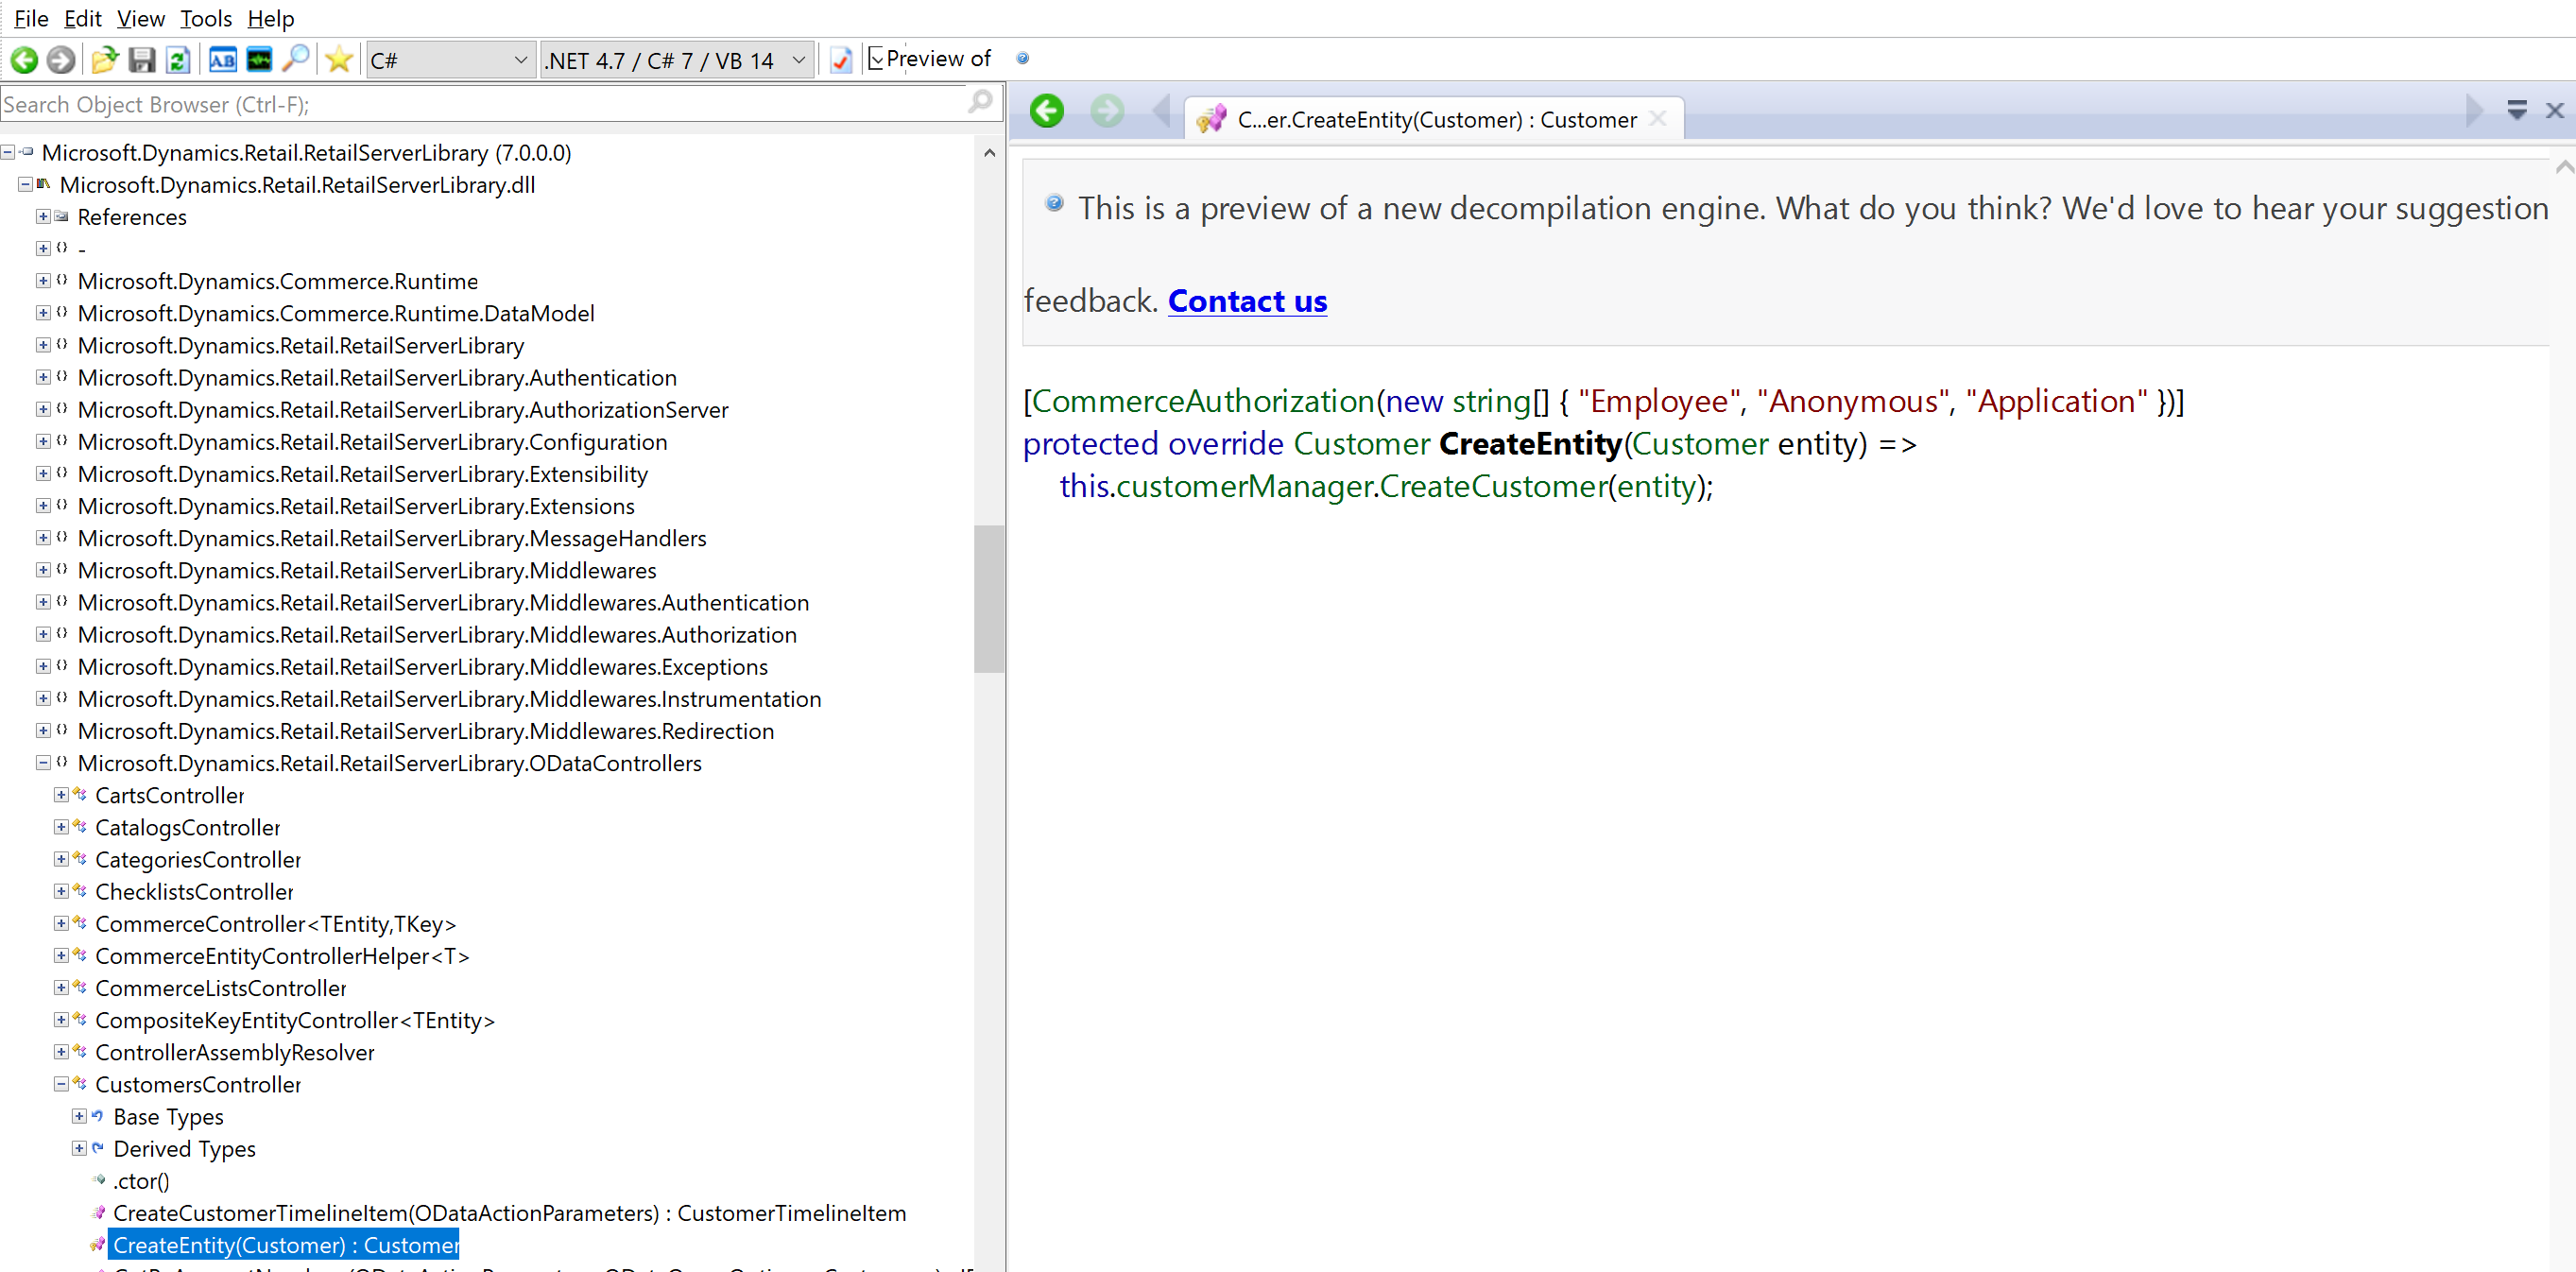
- Now let’s follow the ’trail’ 😉 – Click on this.customerManager.CreateCustomer – This will bring us into the Commerce Run Rime (CRT) area.
- As you can see here, a request is created to a Workflow (a series of Retail Services) – From here we can inquire all ‘Customer Create’ Business Logic as sitting on D365 Retail CRT
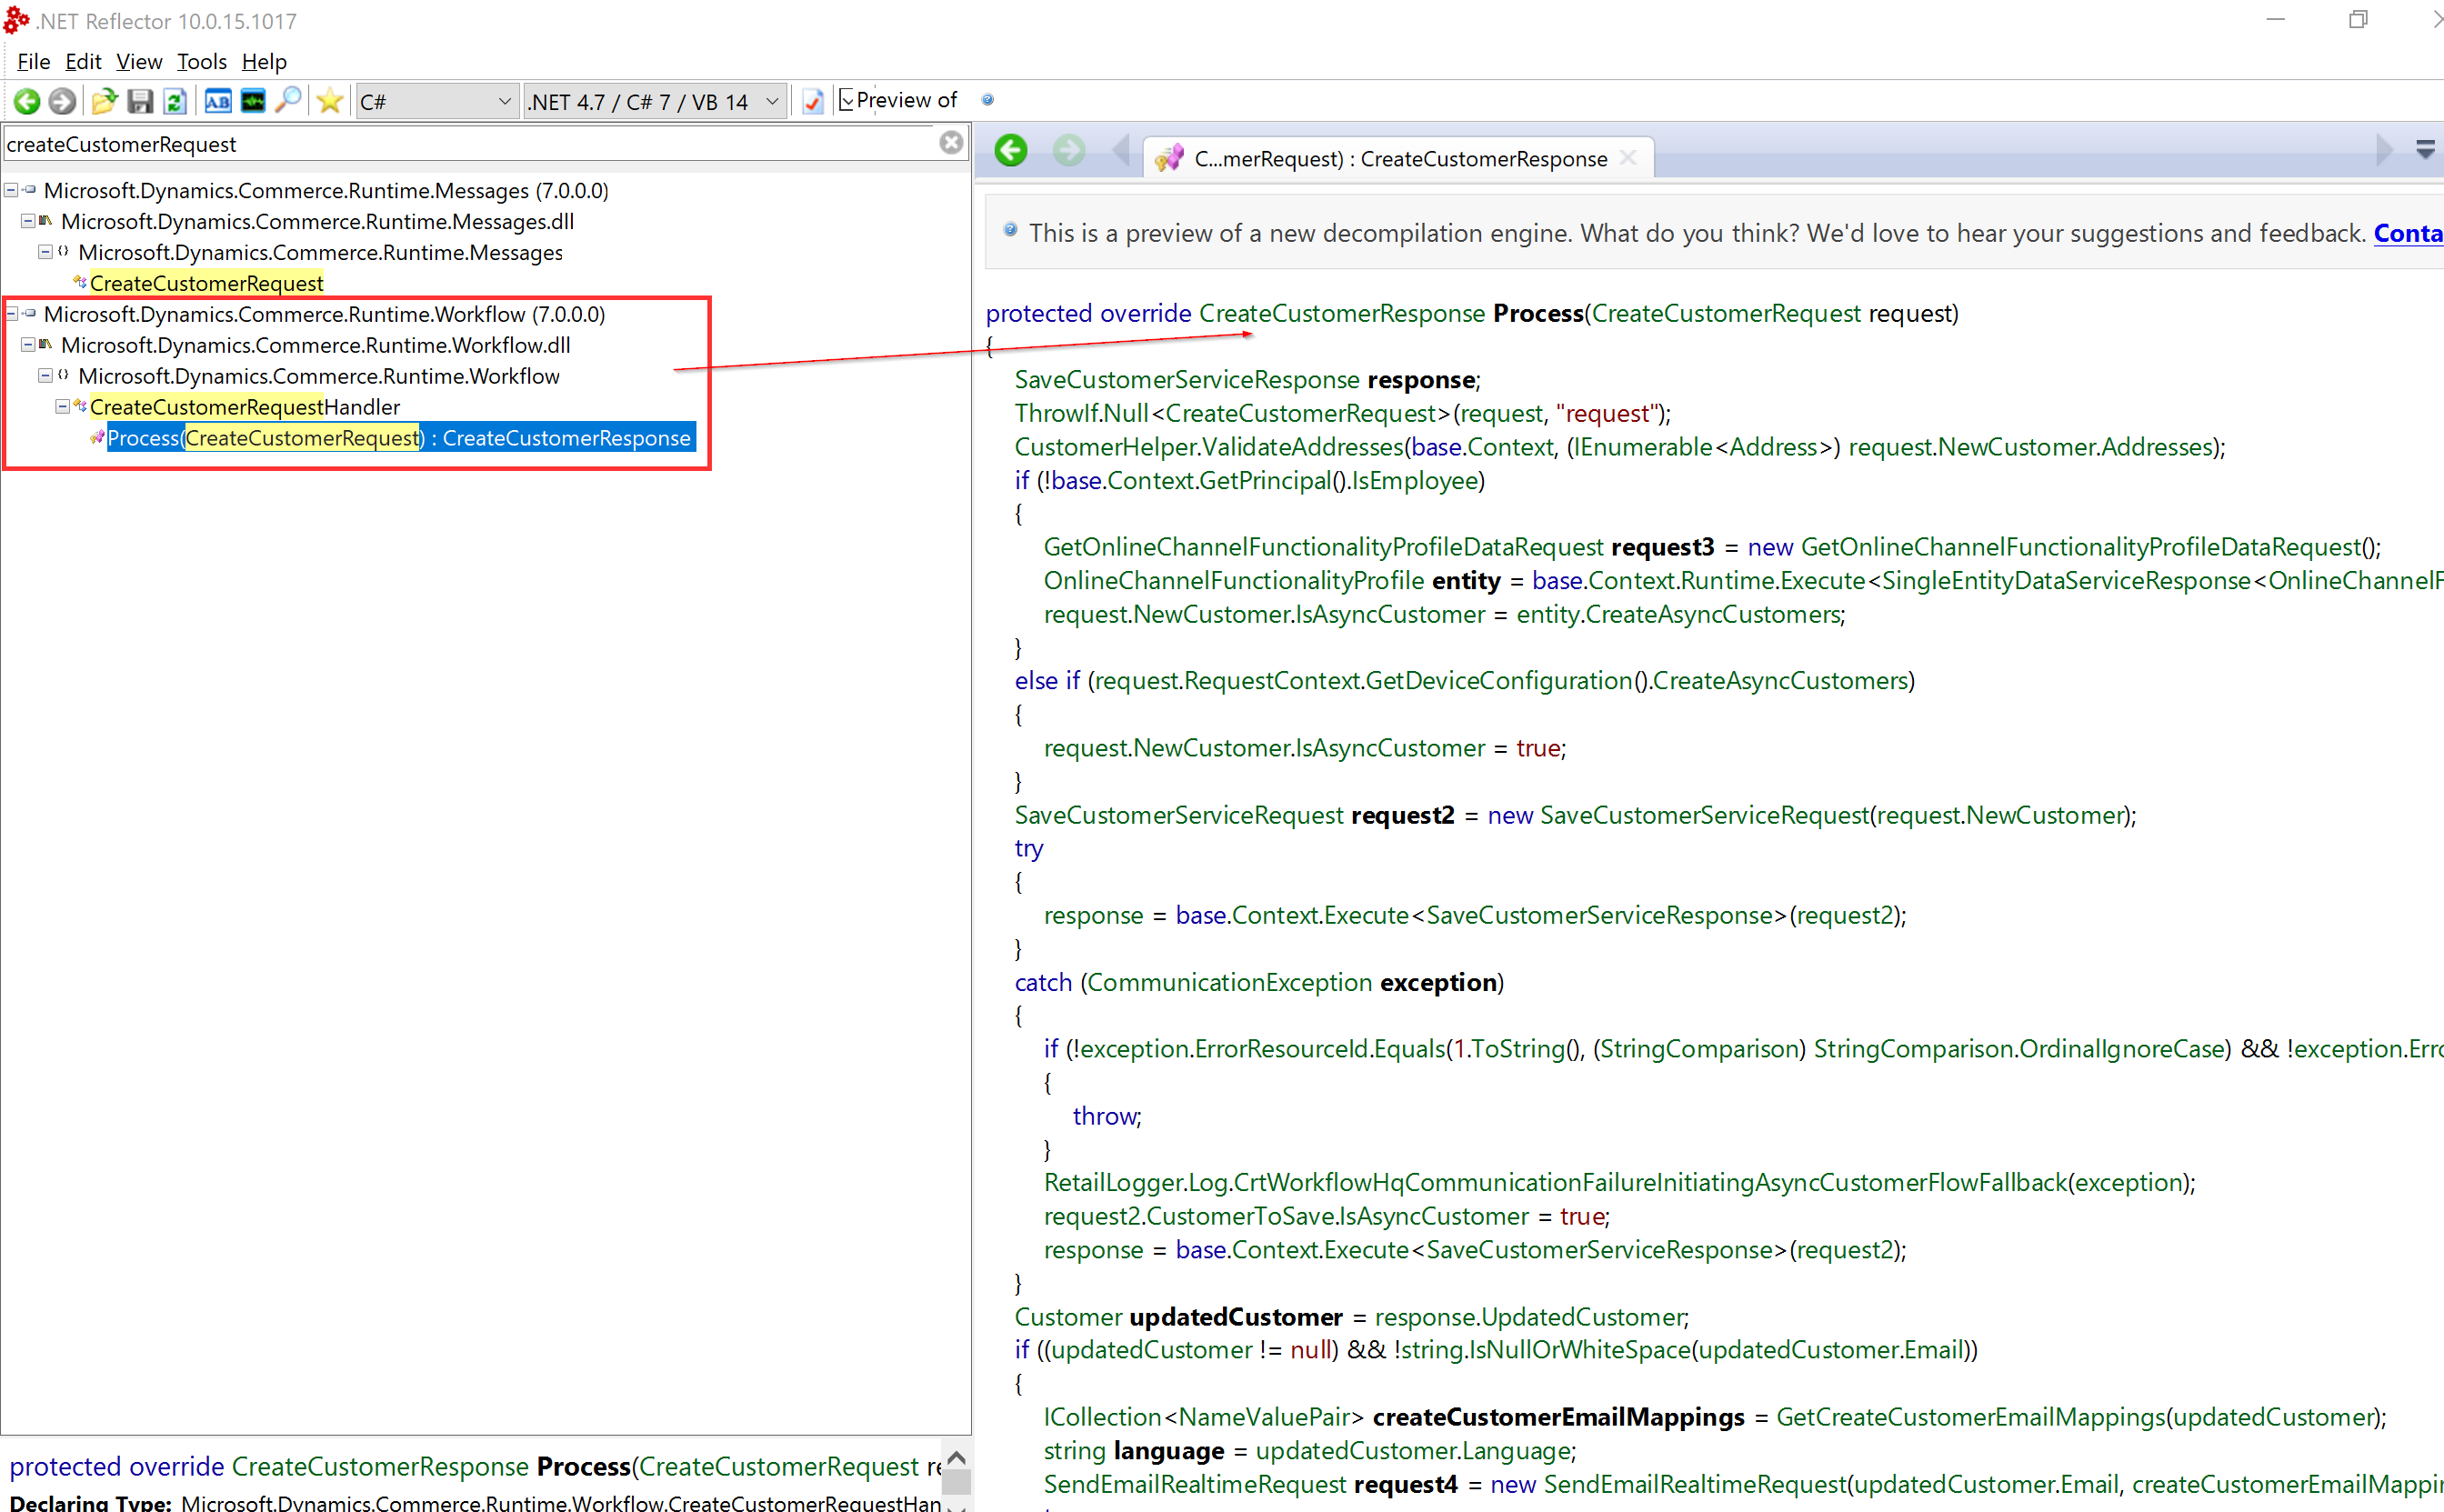
- We can derive the following conclusions from inquiring this Business Logic:
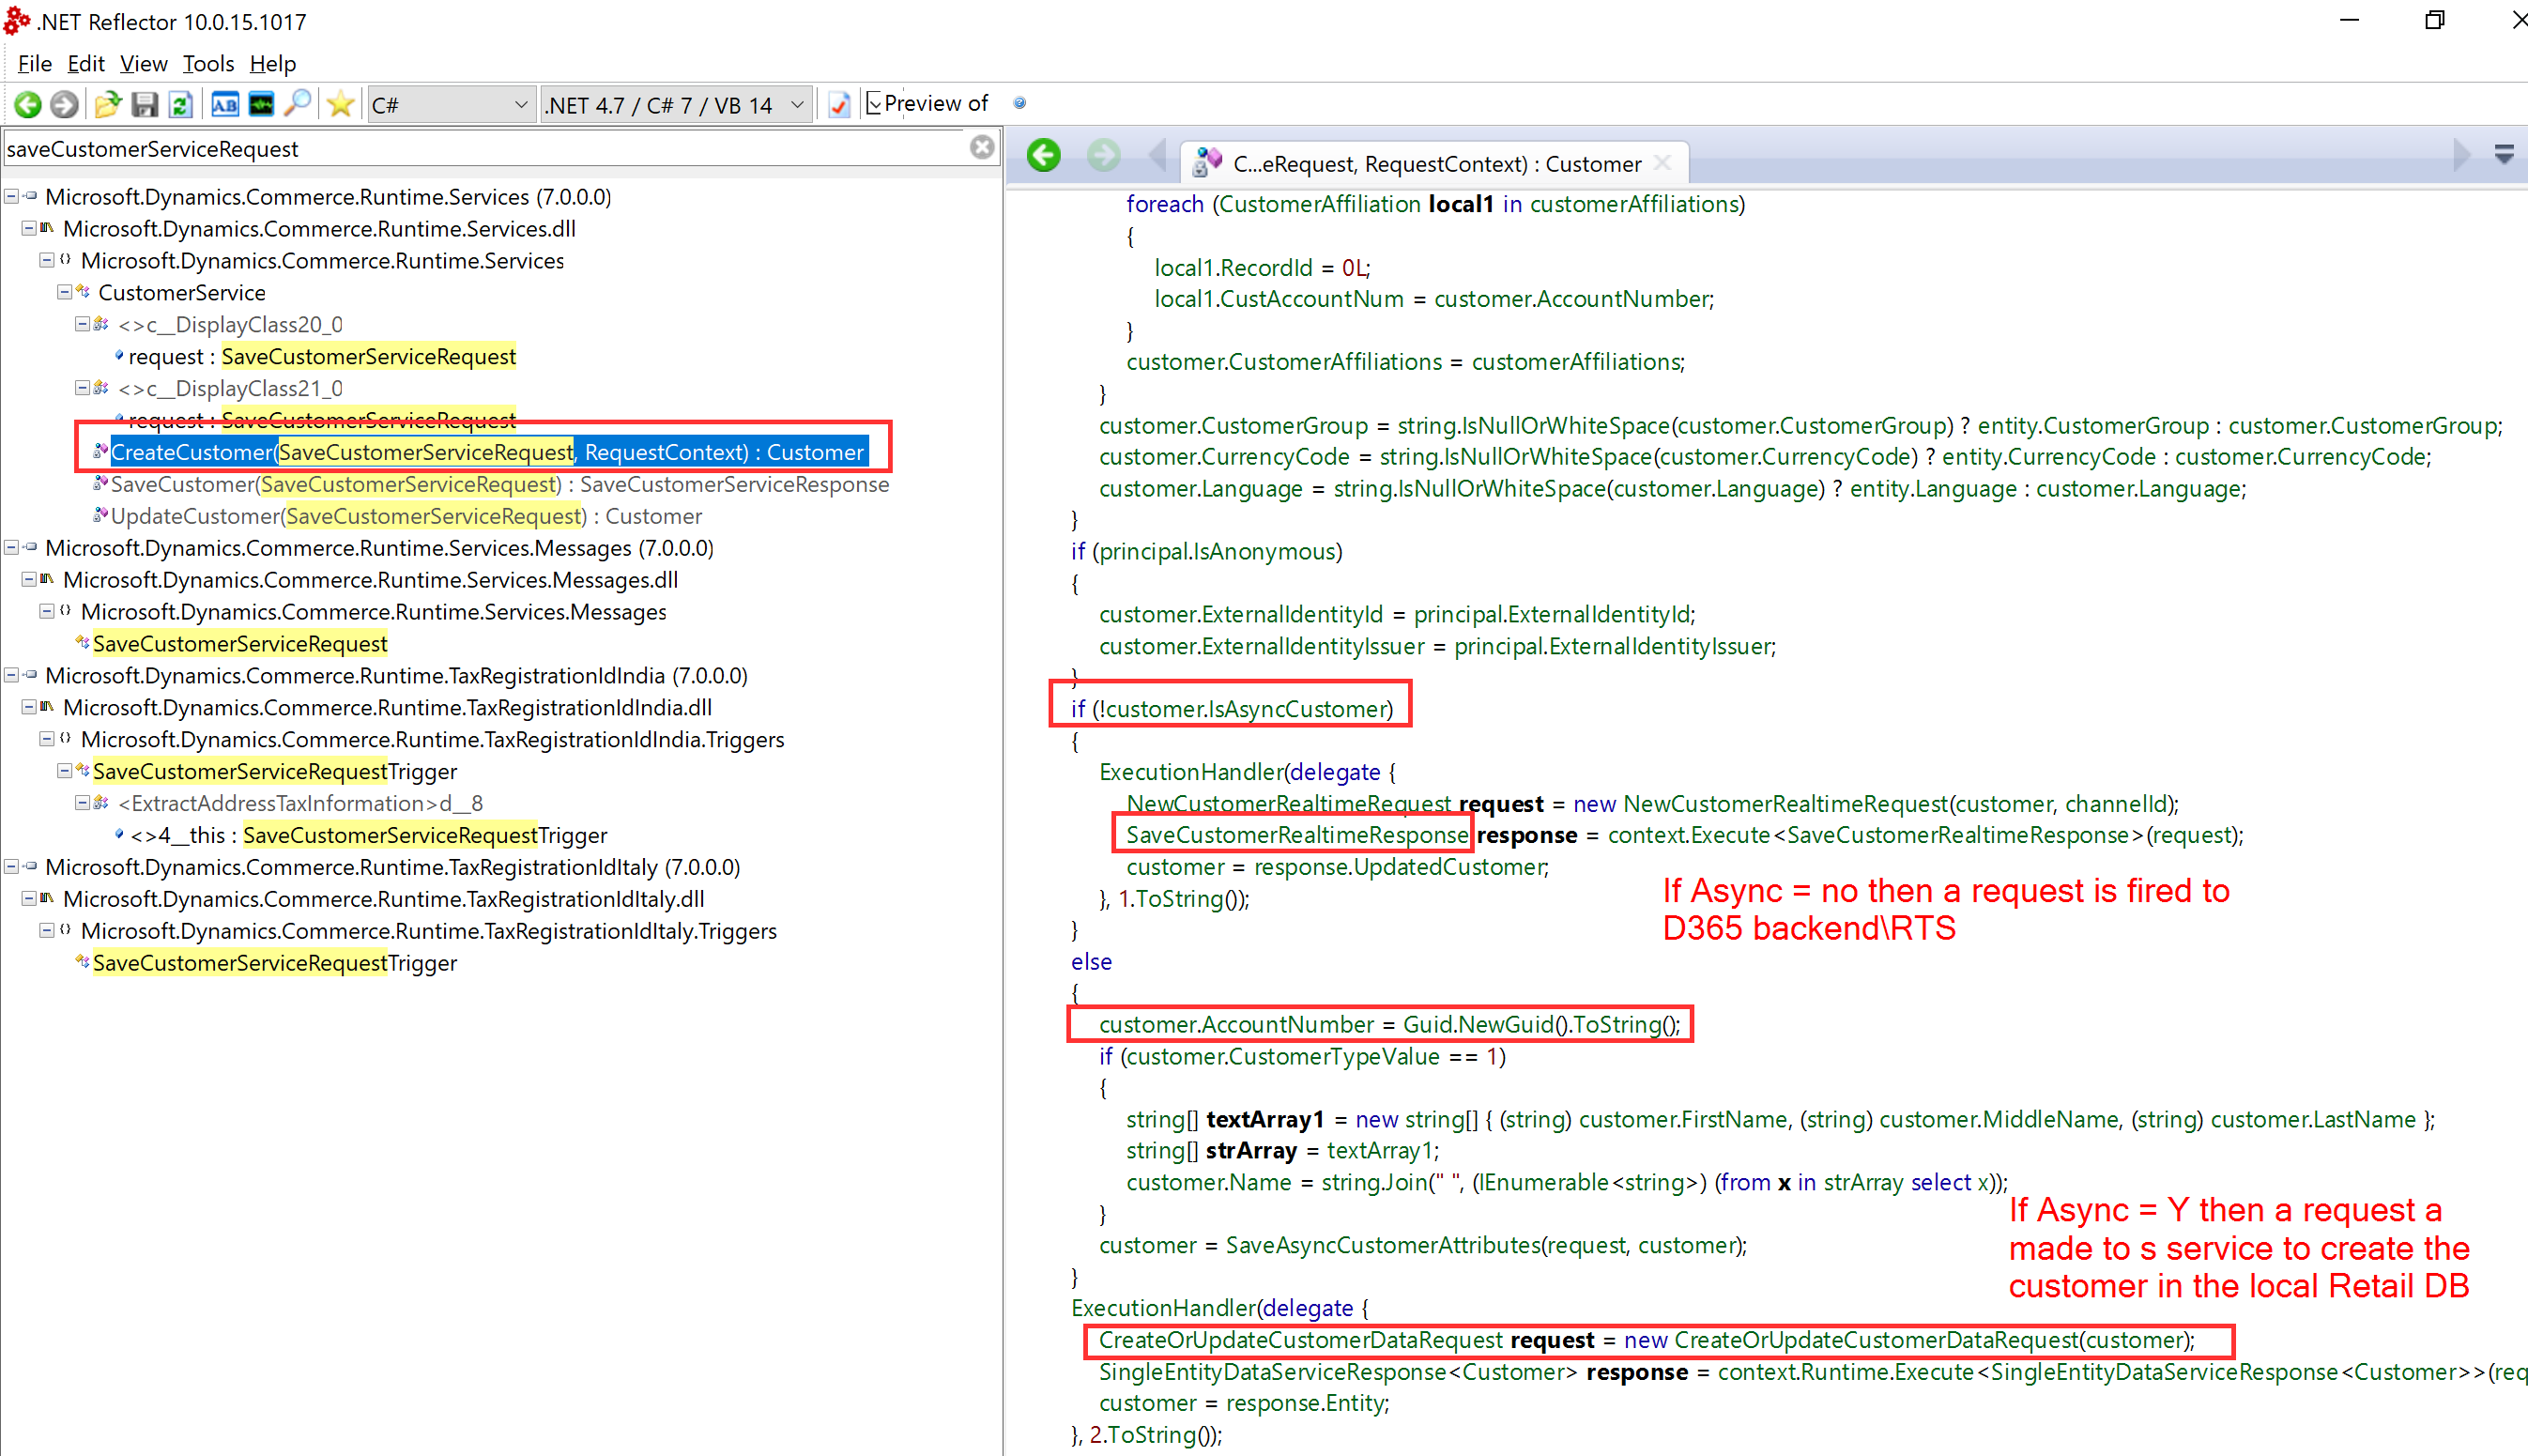
- If the Channel is an Online store then Retail Server is reading the setting whether to create an Asynchronous (offline) customer from the Online store -> Functionality profile
- if the Channel is a Store then Retail Server is reading the setting whether to create an Asynchronous (offline) customer from the Retail store -> Functionality profile

- After determining whether to create an Offline customer as per the previous step (in Contoso: No=create a customer in Real time), the CRT Workflow fires a saveCustomerServiceRequest: if the Customer Account is to be created Asynchronously (offline), then a customer Account number is generated locally and the customer is created into the local Retail database via a Data service (eventually a stored procedure). If the Customer Account is created Synchronously (real time), then a request is fired to D365 backend RTS. As we already know from our previous Fiddler analyses, this is the flow that is followed for the Houston Store (our example here) in the standard Contoso data set. Fiddler showed that the actual D365 method that is hit in the D365 backend is RetailTransactionService.newCustomerExt2. Let’s take a look in there in the next section!
3.3 Analyse what happens within D365 (Retail) Backend
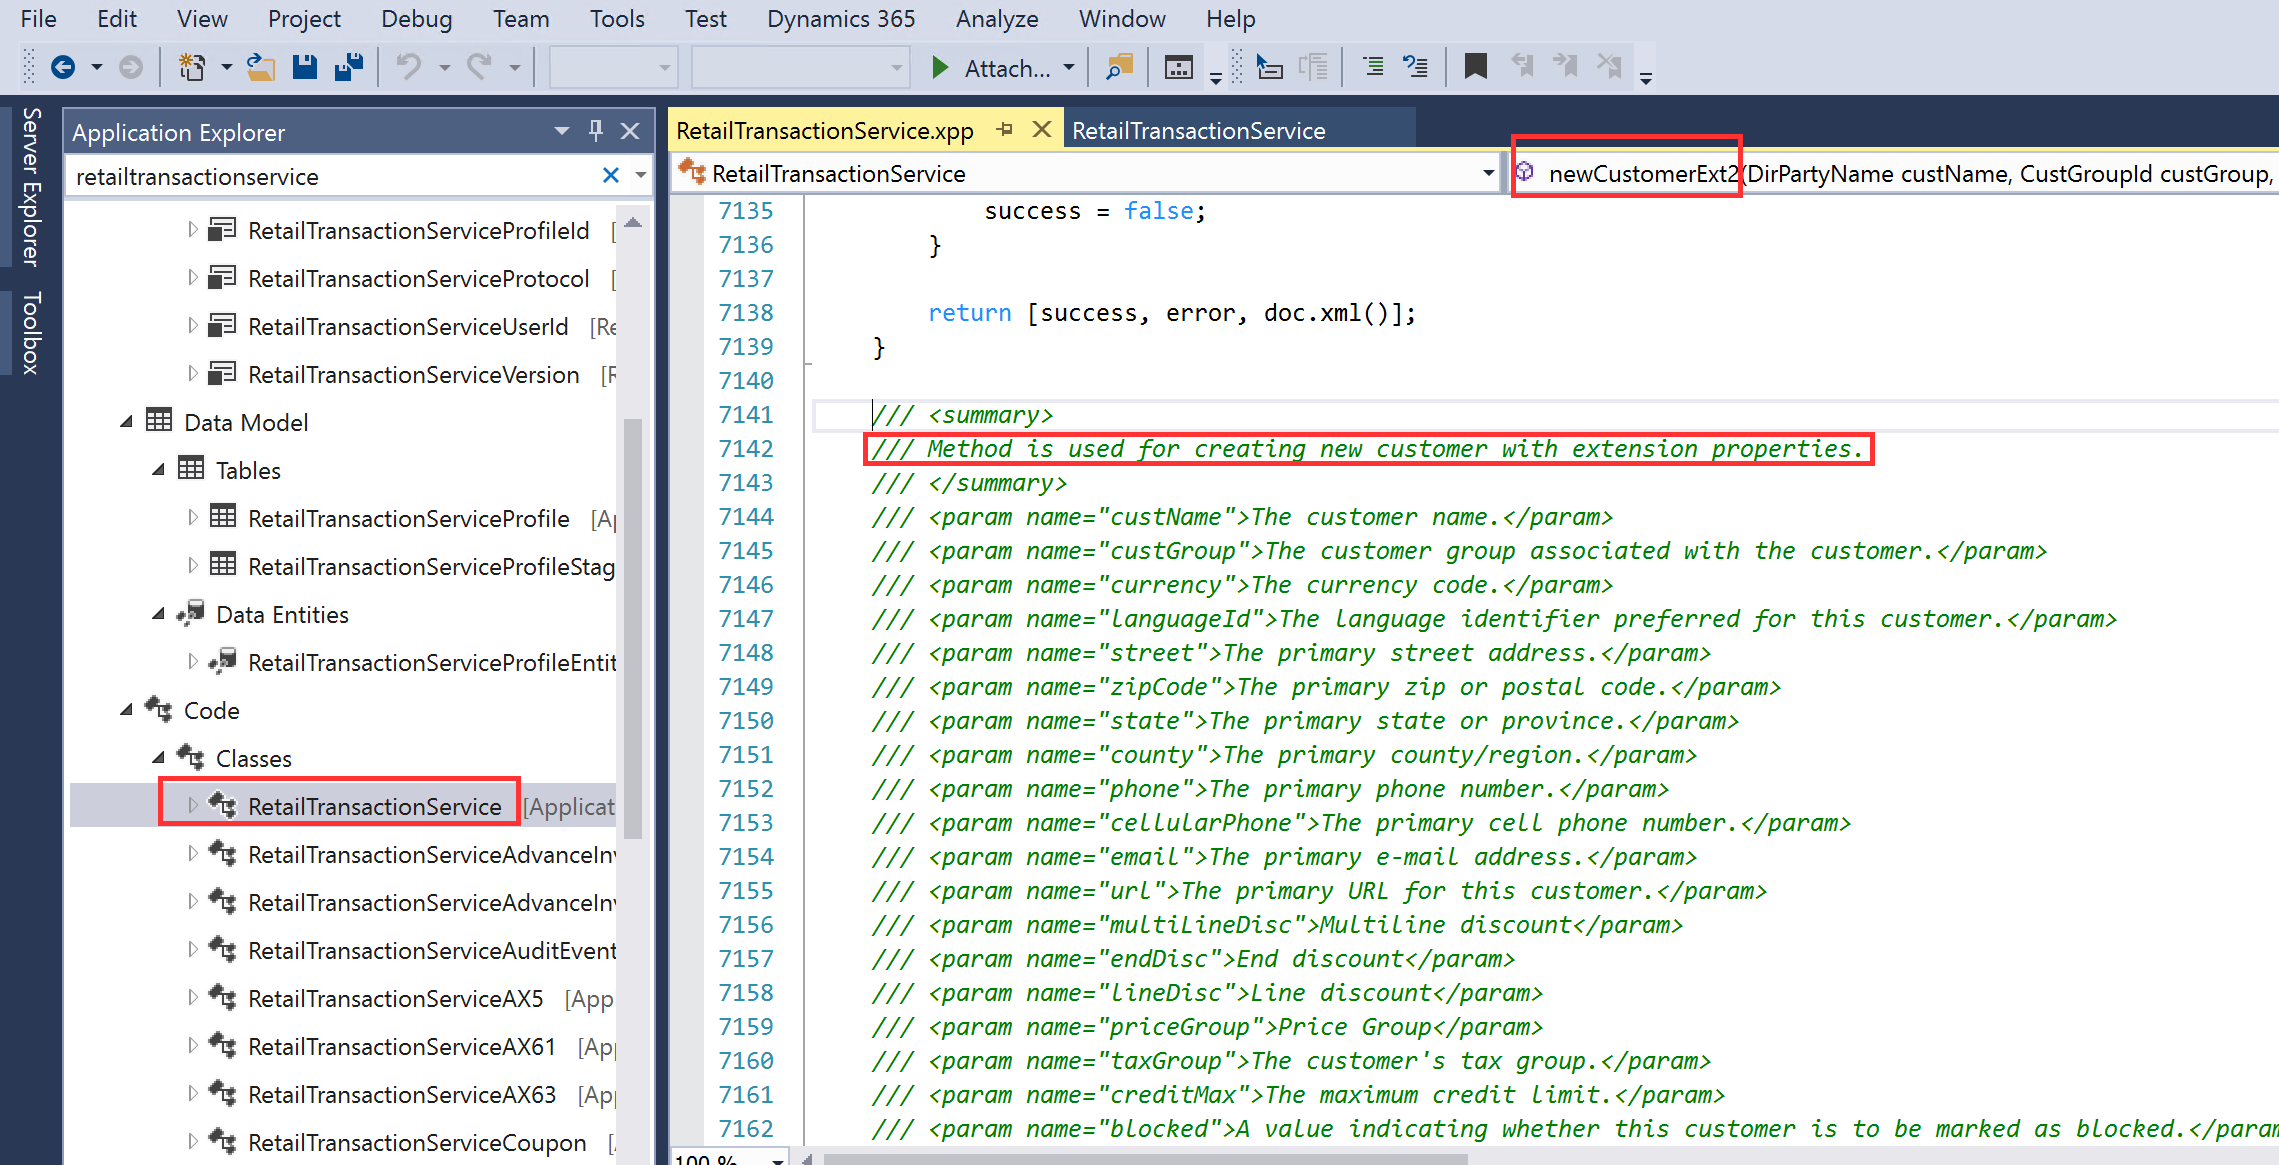
- Open Visual Studio -> D365 AOT on the D365 DEV Box
- Navigate to RetailTransactionService.newCustomerExt2 – As we can read in the comments for this method, this method also supports Extension properties (=custom customer properties in CPOS/Retail Server in case it’s not sufficient to work with the standard Customer Attributes)
- Let’s follow the ’trail’ (call stack) from here into RetailTransactionServiceCustomers.newCustomerExt -> RetailTransactionService.newCustomer -> RetailTransactioServiceCustomer.newCustomer
- Here we find a treasure of Retail Business Logic for creating a customer into the D365 backend – For example, many customer properties are defaulted from the Standard Retail customer which is configured on the Respective channel.
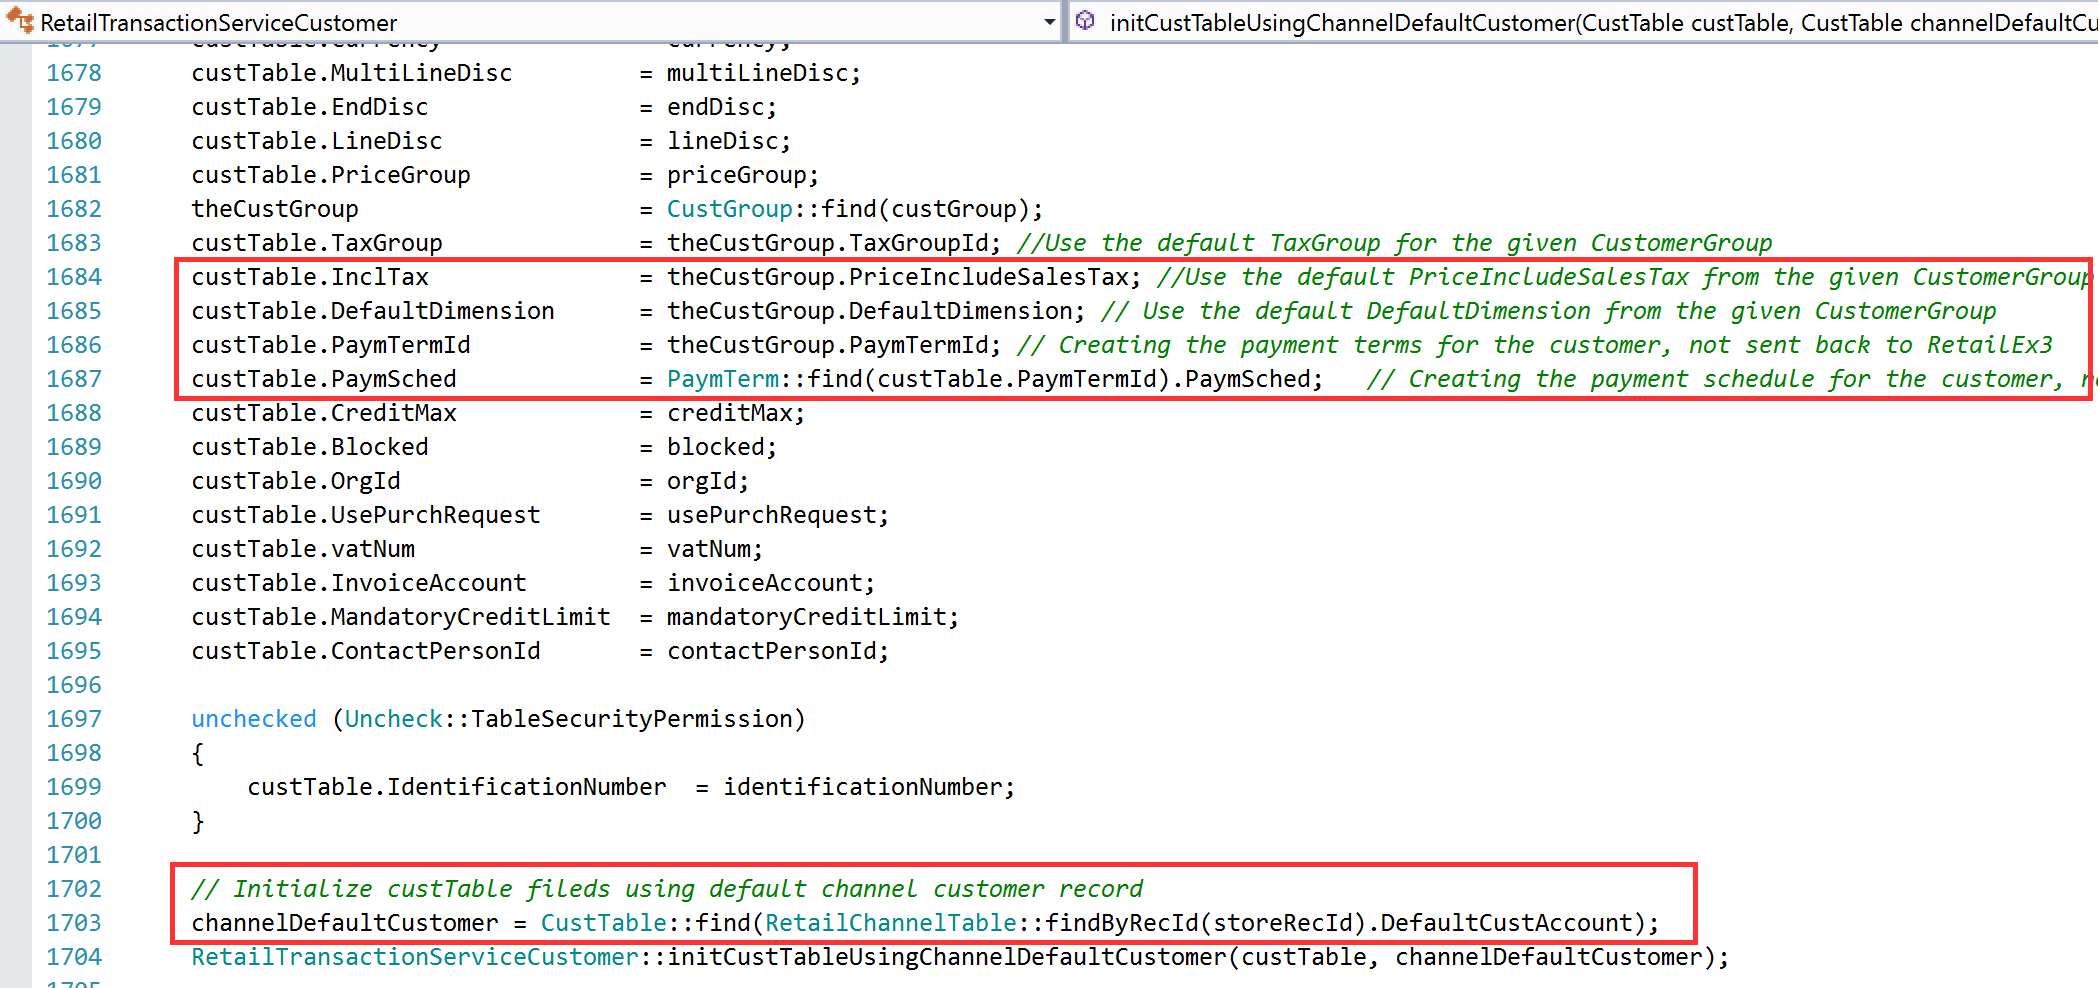
- Feel free to follow the trail deeper into D365!
4 – Some last words…
For the ones who are ‘lost in the woods’ after reading this long blog post, see below an overview of the full E2E ‘Call stack’ for creating a Customer into D365 backend in real time… Yeah.. this WHOLE process happens under 200ms once the Retail Server and Real Time Service are ‘warm booted’… I think it’s simply amazing. What a master piece of art Microsoft have created here !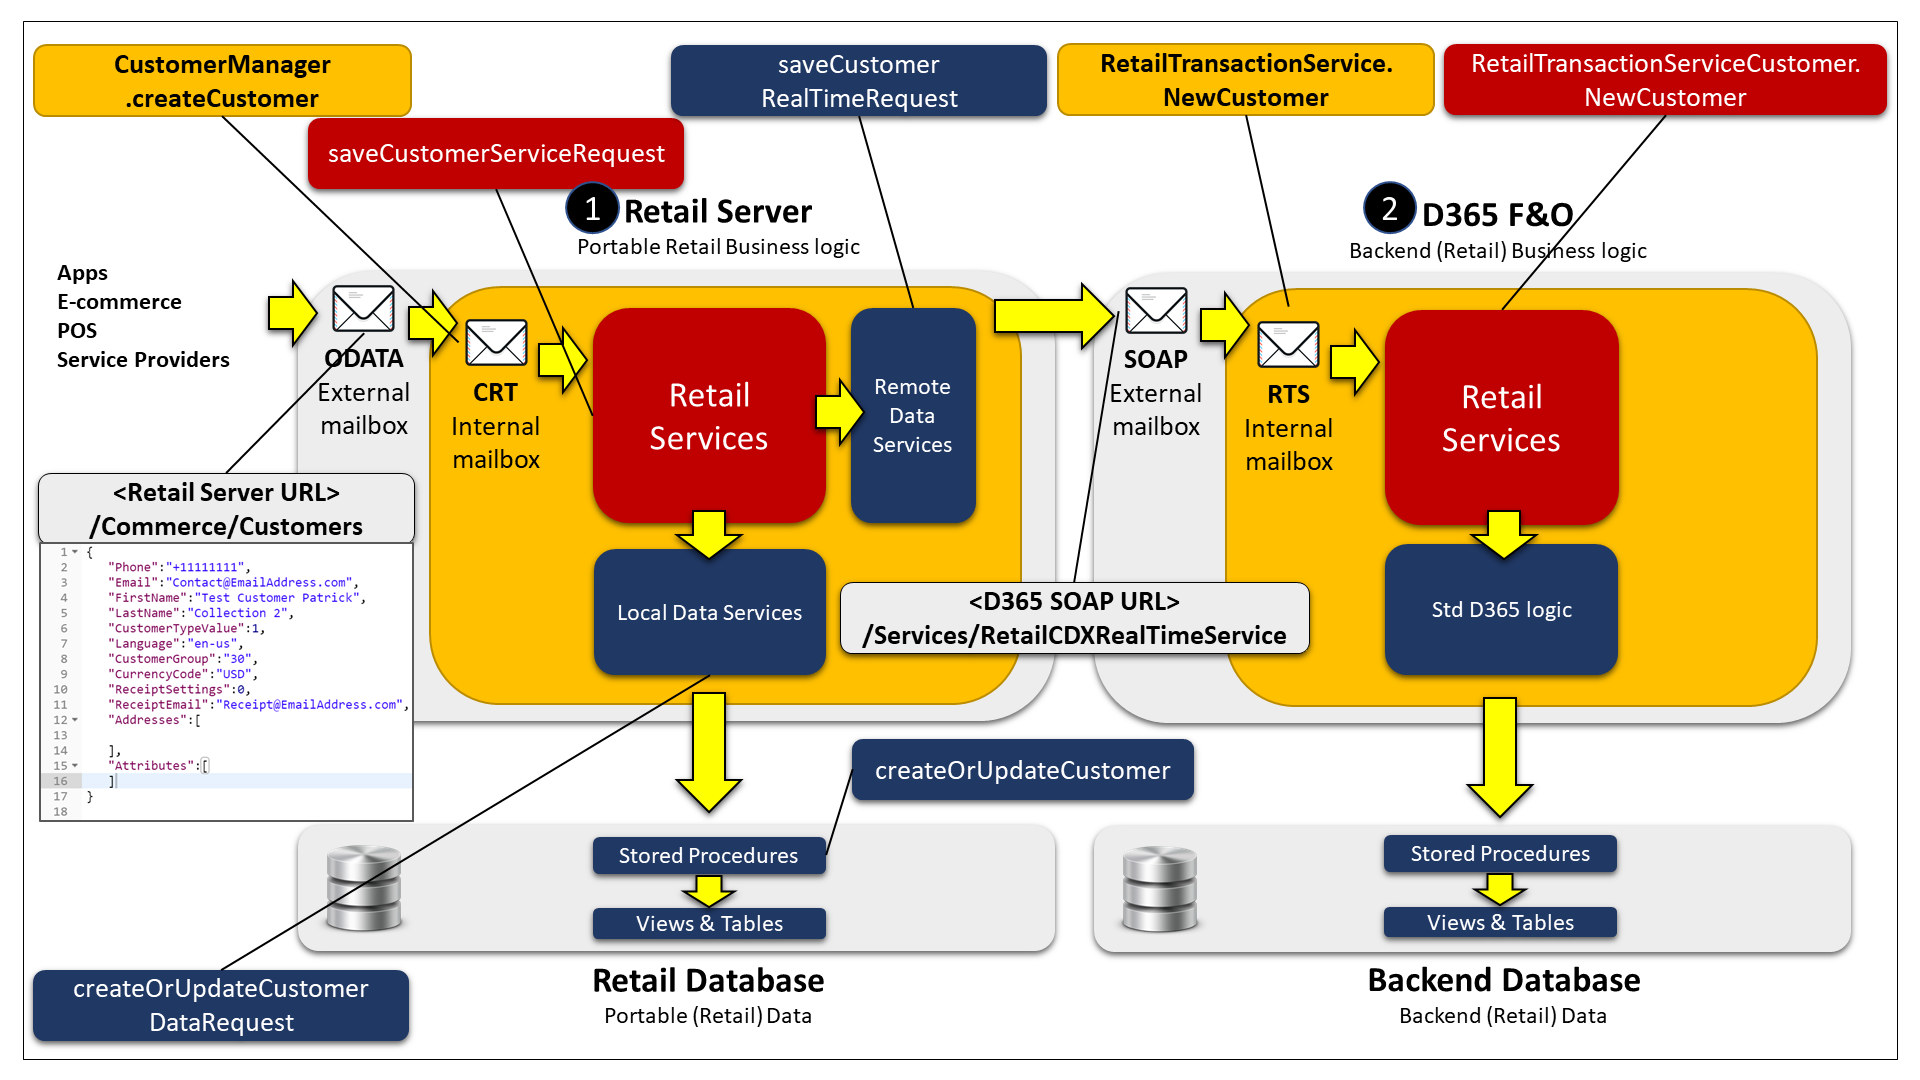
I hope this blog posts give you a kick start in performing any ‘Engine Room’ analysis against D365 Retail. I always learn a lot on how things are really done inside D365 retail when I follow this approach!